Introduction
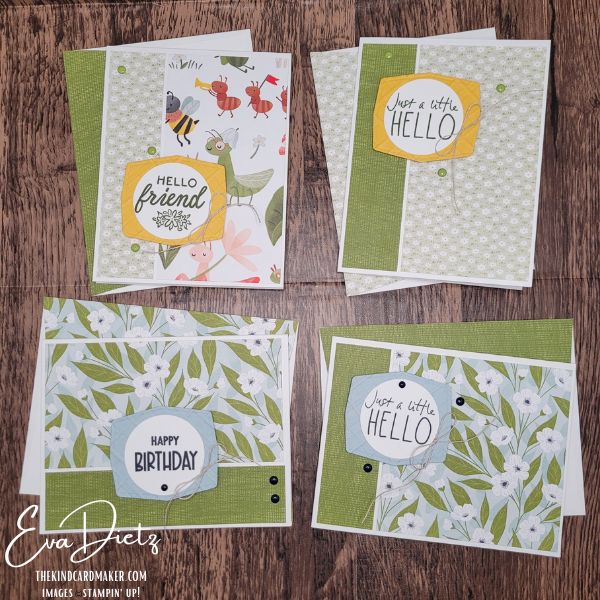
Sometimes the best cardmaking ideas are also the simplest. In today’s project, I’m sharing an easy 4 cards from 2 sheets of cardstock using a layout that is both practical and beautiful. With just two sheets of Thick Basic White cardstock and some of your favorite Designer Series Paper, you can create four unique handmade cards in one crafting session.
One of the things I love most about this layout is how versatile it is. By simply changing the direction of the cardstock, each card opens a little differently. You’ll end up with a mix of portrait and landscape cards, along with both top-fold and side-fold styles—all while using the same basic design.
If you enjoy projects that are quick, beginner-friendly, and perfect for using up your beautiful patterned papers, this card set is for you. It’s a wonderful way to build your card stash while keeping the process simple and enjoyable.
Stampin’ Up! Supplies:
- STAMP SETS: Sweet Bugs, Cutest Crew, Reason to Celebrate, Lovely Arrangements
- CARDSTOCK/PAPERS: Thick Basic White, Basic White, Crushed Curry, Cloud Cover, Cute as a Bug Designer Series Paper (DSP), Lovely Blossoms DSP, 4 Basic White Medium Envelope
- DIES: Forever Florals (small tag die)
- EMBOSSING FOLDER: Forever Plaid 3D
- PUNCH: 1 ¾” Circle Punch
- INK: Secret Sea, Mossy Meadow, Cloud Cover
- EMBELLISHMENTS: Linen Thread, Moody Palette Glossy Dots
- TOOLS: Paper Trimmer, Clear Stamp block D, Stampin’ Bone Folder, Cut and Emboss Machine, Stampin’ Seal Adhesive, Foam Adhesive Sheets, Take Your Pick Tool, Scissors, Simply Shammy.
NON STAMPIN’ UP! PRODUCTS: Glitter Glue with extra metal tip and stainless-steel pins from Amazon (for gluing Linen Thread)

Cutting & Scoring Details:
- Thick Basic White (Two 8 1/2” x 11”sheets give 4 card bases):
- 1st sheet scored at 4 ¼” on short side, then cut at 5 ½” on long side
- 2nd sheet scored at 5 ½” on long side, then cut at 4 ¼”on short side.
Below: Dashed lines are scoring; Red lines are cutting.


- Cute as a Bug DSP:
- Mossy Meadow solid 2 pieces 1 ¼” x 5 ¼” and 1 ¼” x 4”
- Mini Daisy Print 1 ¼” x 5 ¼”
- Mini Daisy Print 2 ¾” x 5 ¼”
- Insects on White 2 ¾” x 5 ¼”
- 3 Envelope Flaps – 2 ¼” x 6” (2 from Mossy Meadow, 1 from Mini Daisy print
- Lovely Blossoms DSP:
- White flower, Mossy Meadow Leaves with Cloud Cover background 4” x 4”
- White flower, Mossy Meadow Leaves with Cloud Cover background 2 ¾” x 5 ¼”
- White flower, Mossy Meadow Leaves with Cloud Cover background Envelope Flap 2 ¼” x 6”
- Crushed Curry: two pieces 2 ½” x 2 ¾”
- Cloud Cover: two pieces 2 ½” x 2 ¾”
- Basic White: 4”x 4” for four circle punchouts
- Linen Thread: Four 6” pieces


Assembly Instructions:
- The prepared Thick Basic White card bases should be in the orientation as shown in the above photo. 2 side folds and 2 top folds.
- Adhere the DSP to the four card bases as shown above. There is a small space, less than 1/8” between the two DSP sections. Try to make the outer perimeter around the DSP as equal as possible.
- Punch out the four circles.
- Stamp sentiments on circles with matching inks.
- Die cut the two Crushed Curry tags and the two Cloud Cover tags.
- Place in the Forever Plaid #D Embossing Folder as shown below and run through your die cut machine.

- Adhere the stamped circle punchout to the embossed plaid tag with your choice of adhesive. Repeat for the four total tags.
- With one Foam Adhesive Sheet and scissors, cut two 1” strips across the whole sheet. Then cut those strips into 1 ½” pieces. Apply one 1” x 1 ½” piece to the back of each tag.
- Affix all tags as shown in photos to card fronts.
- Tie 4 bows with the 6” pieces of Linen Thread.
- Using the non Stampin’ Up! product “Glitter Glue” place a small amount at the edge of the circle on the colored cardstock as shown in the photos. Place the bows and let dry.
- While the glue is drying, finish cards by affixing the embellishments as shown in the photo.
- Adhere the DSP to the four envelope flaps and trim with scissors. If desired stamp an image on the front of the envelope in the lower left corner. The little ladybug reading a book from Sweet Bugs is cute with the two Side Fold cards stamped in Secret Sea ink. The larger flower from Lovely Arrangements looks great with the two Top Fold Cards stamped in Cloud Cover ink.

Visual Learner?
Prefer to see it in action? Watch the full step-by-step tutorial below. Please subscribe to my channel and click the bell to be notified when I upload a new video!
Final Thoughts
Creating an easy 4-card set from 2 sheets of cardstock is a wonderful reminder that cardmaking doesn’t have to be complicated to be meaningful. With one simple layout and a few coordinating papers, you can quickly create a small stack of handmade cards ready to brighten someone’s day.
This design is also a great starting point for experimenting with different Designer Series Papers, sentiments, and embellishments. Once you try it, you may find yourself returning to this layout again and again whenever you want to make several cards at once. If you’d like to explore some other easy cards I’ve designed, visit these links:
https://thekindcardmaker.com/quick-and-easy-all-occasion-cards/
https://thekindcardmaker.com/birthday-card-tutorial-everyday-happiness/
https://thekindcardmaker.com/inspiration-gallery/
Handmade cards are such a beautiful way to spread kindness, encouragement, and connection. I hope this project inspires you to pull out your favorite papers and create a few cards to share with the special people in your life.
✨ If you enjoyed this project, I’d love to hear from you! Leave a comment or just say hello below and let me know which of the four card styles you like best.
Keep the Creativity Going
If you enjoyed learning this easy card layout, here are a few ways we can keep creating together:
Download the free printable tutorial
Get a step-by-step version of this project you can save or print for later.
Get more card ideas in your inbox
Join my Email List and choose a free card tutorial as my thank-you gift.
Try a monthly creative kit
Paper Pumpkin is a fun all-in-one crafting kit that shows up ready to create.
Looking for retired favorites?
Browse my Etsy Shop for retired Stampin’ Up! products and special crafty finds.
Want to create these cards too?
I’ve put together a handy Shopping List so you can find the exact supplies from this tutorial in one place.*
*The products used in this project were available while filming the video and writing this blog post. If something does not show in the list, it is no longer available. Feel free explore the possibility of resale websites or to be creative and make your own substitutions from what you may have on hand.
Shopping with me has perks
Orders of $50 or more earn Loyal Shopper Rewards toward a future crafting spree.
Some of the links above are shopping links to my Stampin’ Up! store. If you choose to order through them, I may earn a small commission at no extra cost to you — and I truly appreciate your support of my small business.
Happy crafting,


0 Comments