If you enjoy creating cards that make people stop and smile before they even open the envelope, this project is for you!
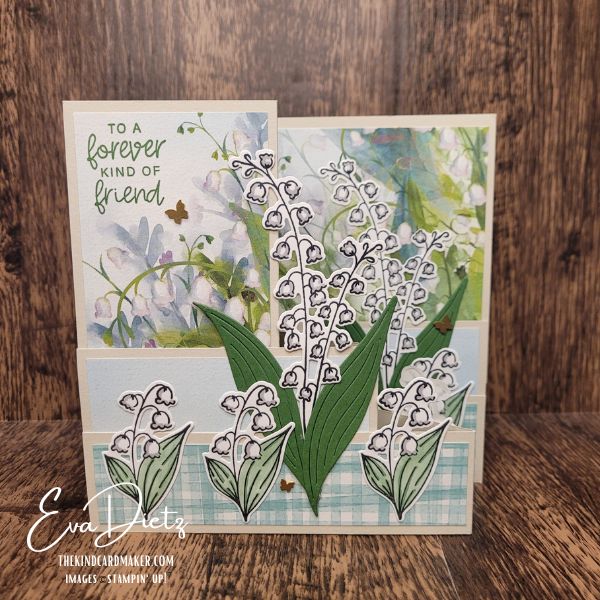
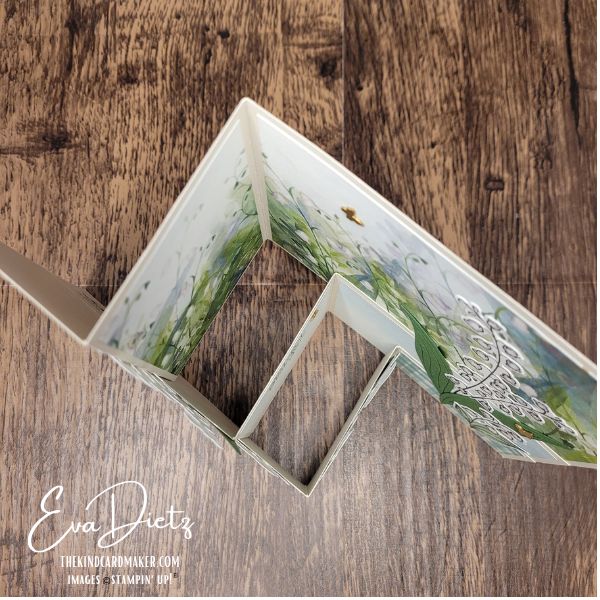
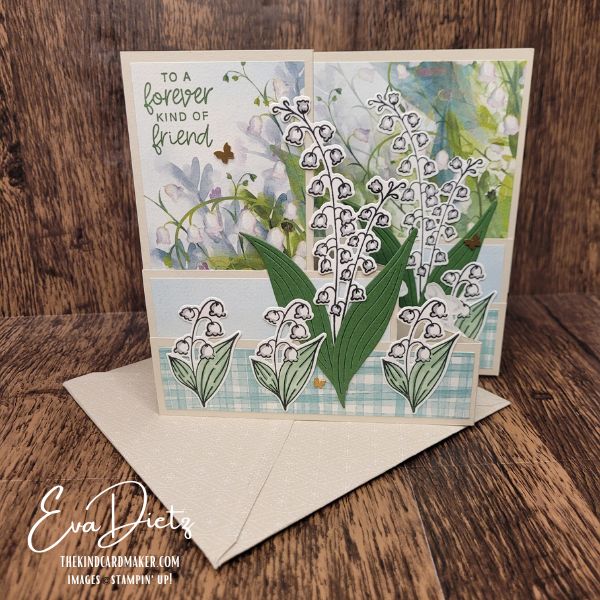
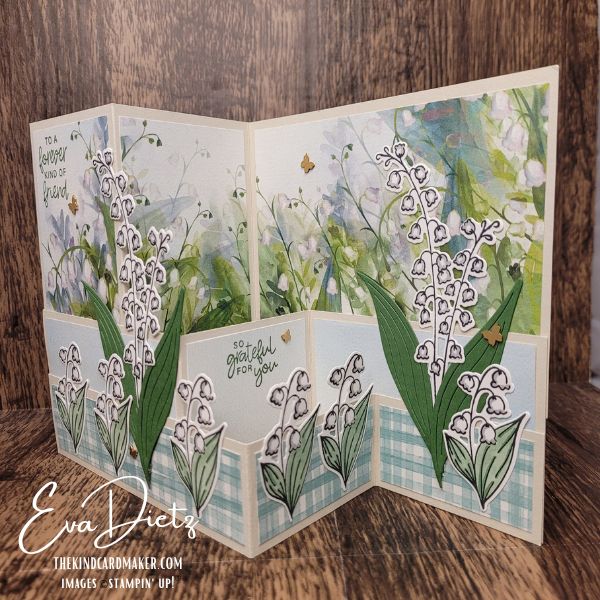
This elegant 6-inch Tall Triple Z Fold Card combines beautiful folds with the delicate Lily of the Valley stamp set and the gorgeous Valley in Bloom Designer Series Paper. The layered construction creates wonderful depth while still folding flat enough to fit inside a custom envelope.
One of my favorite parts of this design is how each folded panel reveals another portion of the floral garden. As the card opens, the lily stems appear to grow across the entire scene, creating a beautiful display that feels almost like walking through a spring garden.
Why You’ll Love This Lily of the Valley Triple Z Fold Card Idea
- Easy scoring once the measurements are prepared
- Beautiful display card that stands on its own
- Perfect for friendship, thinking of you, birthdays and thank you cards
- Coordinates beautifully with matching designer paper
- Includes a custom envelope for mailing or gifting
Although this card has several layers, I built it one section at a time. By preparing all the cardstock, designer paper and stamped pieces first, assembly becomes much more enjoyable.
The Valley in Bloom Designer Series Paper provides much of the beauty, while the die-cut Lily of the Valley images add wonderful dimension. A few brass butterflies finish everything with just the right amount of sparkle.


The stamp set, dies, and designer series paper product images above are (c) Stampin’ Up!
Supplies Used
STAMPS:
- – Lily of the Valley
PAPERS:
- Basic Beige Cardstock
- Valley in Bloom Designer Series Paper (DSP) (3 of the patterns for this card) and 1 full sheet for custom envelope
- Basic White Cardstock for stamped lily of the valley flowers
- Garden Green Cardstock for die cut leaves
INK:
- Memento Tuxedo Black Ink
- Garden Green ink for sentiments
STAMPIN’ BLENDS:
- Light Smoky Slate
- (Retired) Just Jade or Garden Green
DIES:
- Lily of the Valley
EMBELLISHMENTS:
- (Retired) Brushed Brass Butterflies or your choice
TOOLS:
- Paper Trimmer
- Clear Stamp block D and I
- Stampin’ Bone Folder
- Seal Adhesive
- Multipurpose Liquid Glue
- Cut & Emboss Machine
- Take Your Pick Tool
- Paper Snips
- Simply Shammy.
Cutting & Scoring Measurements
- Basic Beige Cardstock:
- Card Base 11” x 4 ¼”, scored at 2 ¾” and 5 ½”
- Middle Layer 11″ x 2 3/4″, scored at 4 1/8″ and 6 7/8″
- Bottom Layer 11″ x 1 1/2″, scored at 5 1/2″ and 8 1/4″
- Valley in Bloom DSP
- Card Base – Lily of the Valley sheet – 2 pieces 2 ½” x 4” and 1 piece 5 ¼” x 4”
- Middle Layer – Pale Light Blue sheet – 2 pieces 3 7/8” x 2 ½” and 1 piece 2 ½” square
- Basic White Cardstock – 2 larger scraps for 2 Lily of the Valley flower stems and smaller scraps for 6 smaller Lily of the Valley plants.
- Basic White Cardstock for back panel for message writing 4” x 5 ¼” and DSP piece for ½” x 4” strip
- Garden Green Cardstock – scraps for 4 die cut leaves

Step by Step Assembly Instructions
- Score the three Basic Beige cardstock layers and lay them out flat as shown in the Cutting Guide.
- Cut the 9 pieces of DSP and lay on the cardstock by color rows.
- With the Garden Green Ink, stamp the 2 sentiments on the DSP sections shown.
- Adhere all the DSP to their appropriate sections on the 3 Basic Beige layers.
- With a pencil and ruler, measure down from the card base layer top left and right corners and mark 3 1/4” down on each side. Align the middle section so the top edge of that section touches the two tick marks. The height of the card should now be 6” tall on both left and right edges. Now that you see how the middle section will sit on the card base it is time to flip the middle section over (top to bottom, NOT left to right. Apply the liquid glue to that area lower than the 3 1/4” mark on the left section of the card base. Then you will apply glue to the entire back side of the far-right section of the middle panel. Once glue is on those two locations, carefully flip the middle section back over and affix the left edge at the 3 1/4” mark and the right section at the 3 1/4” mark on the right edge. Double check your 6” tall measurement to make sure everything is aligned well, sides especially.
- Once the glue is fairly dry, go ahead and fold the card’s two sections on their score lines and score with the bone folder. Also fold and score the final bottom layer section as that will be glued next.
- Align the bottom edge of the bottom layer with the lower edge of the middle layer and adhere a portion of the bottom layer left panel down to the left middle panel and all of the right section down. After the glue has had a chance to dry, close the card completely on their score lines. Stand the card upright and it should stand well.
- Now it is time to stamp all the lily pieces on Basic White and die cut the 4 Garden Green leaves. You will also stamp one small lily on the Basic White back layer for the card for the personalized message. You can also go ahead and glue down the ½” DSP strip on that back panel too.
- Before you die cut all the lily pieces now is the time to do the coloring with the Stampin’ Blends alcohol markers. You will be adding a shadow with the Smoky Slate pen to the white lily blossoms. Then color the light green on the white leaves and outline the veins with the darker green marker. Then die cut all the lily pieces out, except for the stamped image for the message layer. You may glue that in place now on the back of the card base.
- Then it is time to assemble and affix the lily stems to the card base. Notice how a couple of the small lily blossoms overlap the green leaves. Do not put glue on those when affixing the top blossoms and stem base to the card base. When you adhere the green leaves slide them under those couple blossoms. Be sure to overlap the leaves to hide the lily stem base.
- Next affix the leaves only of the 6 smaller lily plants to the bottom layer only. Add the brass butterflies where you would like.
- Make a Custom Envelope from one whole sheet of the diamond pattern of Basic Beige from the DSP package. Start by cutting down the 12” x 12” piece of DSP to a 10” x 10” square. Then make yourself a square that is 6 ¼” x 5 ¾” from a piece of backing board from a DSP package. Using the attached pattern, measure and fold the 4 sides of the DSP to fit your template. You will use liquid glue to carefully adhere the bottom and sides together, leaving the top flap open until the card is placed inside. You may want to add a 2” x 4” Avery Label on the envelope front to write the mailing address.

Final Thoughts
Whether you’re making one special card or several for your card stash, I hope this design inspires you to try a taller fun fold. It looks impressive, yet each step is straightforward when you work through the construction one layer at a time.
You’ll find all of the cutting measurements, scoring instructions, supplies and assembly steps in the downloadable tutorial.

Keep the Creativity Going
If you enjoyed learning this technique and making these cards, here are a few ways we can keep creating together:
Download the free printable tutorial
Get a step-by-step version of this project you can save or print for later.
Get more card ideas in your inbox
Join my Email List and choose a free card tutorial as my thank-you gift.
Try a monthly creative kit
Paper Pumpkin is a fun all-in-one crafting kit that shows up ready to create.
Looking for retired favorites?
Browse my Etsy Shop for retired Stampin’ Up! products and special crafty finds.
Want to create these cards too?
I’ve put together a handy Shopping List so you can find the exact supplies from this tutorial in one place.*
*The products used in this project were available while filming the video and writing this blog post. If something does not show in the list, it is no longer available. Feel free to be creative and make your own substitutions from what you may have on hand.
Shopping with me has perks
Orders of $50 or more earn Loyal Shopper Rewards toward a future crafting spree.
Some of the links above are shopping links to my Stampin’ Up! store. If you choose to order through them, I may earn a small commission at no extra cost to you — and I truly appreciate your support of my small business.
I’d Love to Hear From You!
Have you ever made a Triple Z Fold card before?
Leave a comment below and tell me what occasion you would use this elegant Lily of the Valley card for. I always enjoy hearing your creative ideas!
Happy crafting,


0 Comments