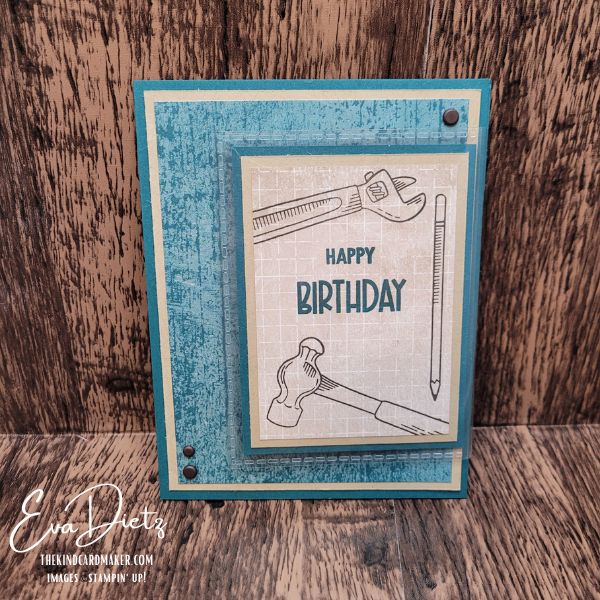
If you’ve ever struggled to create a masculine birthday card that feels both meaningful and practical, you are going to love this design. This quick and easy masculine birthday card with gift card holder combines a clean, tool-themed layout with a clever surprise feature that makes it extra special—without adding extra complexity.
Using the Trusty Tools stamp set along with a unique Flip Flap element, you can create a hidden pocket for a gift card or cash. It may look like a fun fold when opened, but it’s actually simple and beginner-friendly to assemble. If you’re looking for an easy way to create handmade cards, this project is a wonder technique to try.
Why This Card is Extra Special
What makes this different?
The Flip Flap turns this design into a hidden gift card holder right on the front of the card.
Why would someone want to make it?
It’s quick to assemble but delivers a fun “wow” moment when opened.
Who is it perfect for?
Men who enjoy woodworking, tools, or hands-on hobbies.

Supplies Used
- STAMP SETS: Trusty Tools, Reason to Celebrate, Around it All (retired)
- CARDSTOCK/PAPERS: Pretty Peacock, Crumb Cake, Nature Walk DSP, Basic White, Basic White Medium Envelope
- INK: Pretty Peacock, Early Espresso
- ACCESSORY: 3” x 4” Flip Flap
- EMBELLISHMENTS: Earthy Matte Dots (Early Espresso)
- TOOLS: Paper Trimmer, Clear Stamp block D, Stampin’ Bone Folder, Stampin’ Seal Adhesive, Scissors, Take Your Pick Tool, Simply Shammy.

Cutting & Scoring Details
- Pretty Peacock 5 ½” X 8 ½” (scored at 4 ¼”), 3” x 4”
- Crumb Cake 4” x 5 ¼”, two pieces 2 ¾” x 3 ¾”
- Nature Walk DSP (Pretty Peacock woodgrain design) 3 ¾” x 5”, 2 ¾” x 3 ¾”, envelope flap 2 ¼” x 6” (Crumb Cake Grid) two pieces 2 ½” x 3 ½”
- Basic White 4” x 5 ¼”


Assembly Instructions:
- Starting with the Pretty Peacock card base, open flat so that Flip Flap can be attached first to the right-side inner back at approximately ⅝” from the top and bottom edges. Also align the peel and stick adhesive strip so it will be just inside the right inner edge. By doing this the Flip Flap will fold over the card front easily and allow for additional layers inside the Flip Flap when inserted.
- Adhere the 4” x 5 ¼” Crumb Cake layer and 3 ¾” x 5” Nature Walk DSP layer to the card front.
- Align 2 ¾” x 3 ¾” Crumb Cake layer to align with the right edge of the DSP and ⅞” from the top and bottom edges of the card base.
- For the Flip Flap pouch – Front side – adhere the 2 ¾” x 3 ¾” Crumb Cake piece on top of the 3” x 4” Pretty Peacock layer. Flip insert over and adhere the 2 ¾” x 3 ¾” Nature Walk DSP (Pretty Peacock woodgrain). Flip back over to be ready for the final layer.
- Next are the four pieces of image and sentiment stamping (two 2 ½” x 3 ½” Nature Walk DSP Crumb Cake grid, the 4” x 5 ¼” Basic White layer and the front lower left corner of the envelope). Use the attached photos as reference for layout. The sentiments are stamped in Pretty Peacock, and the tool images are stamped in Early Espresso. When stamping is finished, adhere images to their respective layers. Insert the finished multi-layer piece into the Flip Flap.
- Finish your project by adding 3 Early Espresso embellishments.
- Insert a Gift Card or Cash into the Flip Flap when it is in the open position.
- Adhere the Nature Walk DSP to the envelope flap, then trim off excess.

Watch the Tutorial of the Easy Masculine Birthday Card with Gift Card Holder video
Bonus Cards to Share


This Thank You card above is made using the Lovely Arrangements stamp set and Lovely Blossoms Designer Series Paper, along with a Basic White card base, Cloud Cover cardstock layer, and Secret Sea Ink.


This Happy Birthday card above is made using the Sweet Bugs stamp set and the Cute as a Bug Designer Series Paper, along with Poppy Parade card base, Mossy Meadow cardstock layer, retired Layering Ovals Dies and assorted Stampin’ Blends to color the darling insects.
Final Thoughts
Simple cards can still create meaningful moments, and this design proves it beautifully. By adding just one unexpected feature, you transform a basic layout into something interactive and memorable.
Keep this design in mind for future masculine cards—you can easily change the papers and stamps to fit any occasion while keeping the same clever structure. Handmade cards like these are a beautiful way to share kindness.
Keep the Creativity Going
If you enjoyed this project, be sure to check out another fun fold card idea on my blog that you can adapt as another masculine fun fold card. There are so many ways to take a simple layout and turn it into something extra special!
Please Comment Below – Which would you place in the Flip Flap – a gift card or tuck in cash?
Here are some other ways to Keep the Creativity Going too:
Download the free printable tutorial
Get a step-by-step version of this project you can save or print for later.
Get more card ideas in your inbox
Be sure to join my Email List so you never miss a new card idea, and choose a free card tutorial as my thank-you gift.
Try a monthly creative kit
Paper Pumpkin is a fun all-in-one crafting kit that shows up ready to create.
Looking for retired favorites?
Browse my Etsy Shop for retired Stampin’ Up! products and special crafty finds.
Want to easily create this card too?
I’ve put together a handy Shopping List so you can find the exact supplies from this tutorial in one place.*
*The products used in this project were available while filming the video and writing this blog post. If something does not show in the list, it is no longer available. Feel free to be creative and make your own substitutions from what you may have on hand.
Shopping with me has perks
Orders of $50 or more earn Loyal Shopper Rewards toward a future crafting spree.
Some of the links above are shopping links to my Stampin’ Up! store. If you choose to order through them, I may earn a small commission at no extra cost to you — and I truly appreciate your support of my small business.
Happy crafting,


0 Comments