If you’ve been saving your Designer Series Paper scraps and wondering how to turn them into something truly special, this project is going to make you very happy.
I was inspired to experiment with this technique after I attended the Spring 2026 Creativate Online Retreat and made this card below following Jackie Bolhuis’s instructions. Here’s my card I made using the Lovely Arrangements bundle and coordinating Lovely Blossoms Designer Series Paper.
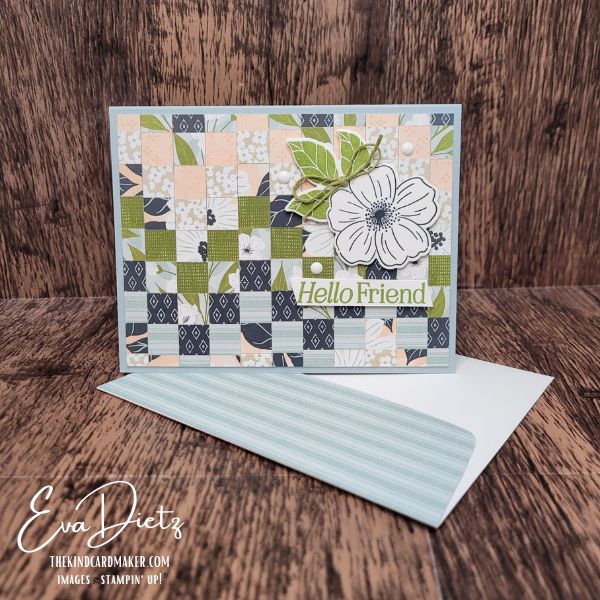
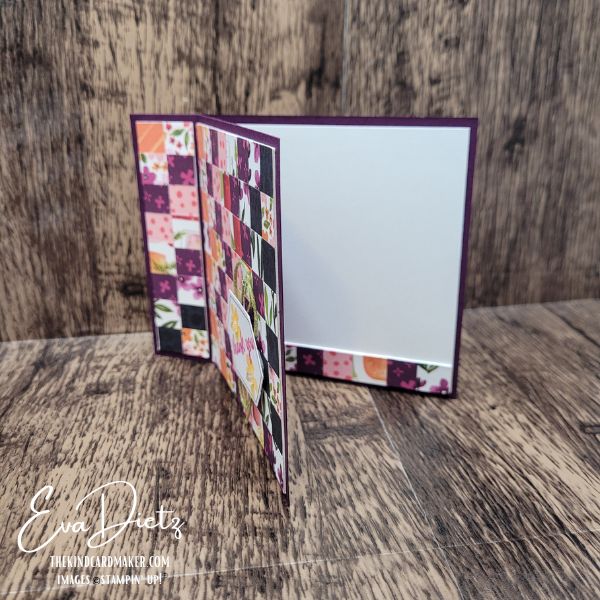
Today I’m sharing how to combine the Bargello Technique Card with a Book Bind Fun Fold to create six beautiful handmade cards—each with a completely different look using the same basic idea.
Why You’ll Love This Card Design
👉 This card is perfect because it turns small strips of paper into a stunning woven-style design that looks much more complicated than it actually is—plus the book bind fold gives it a polished, professional finish.
What Is the Bargello Technique Card?
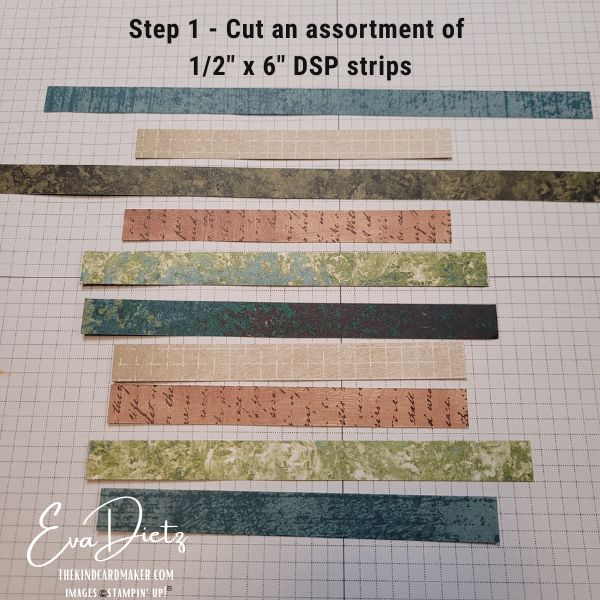
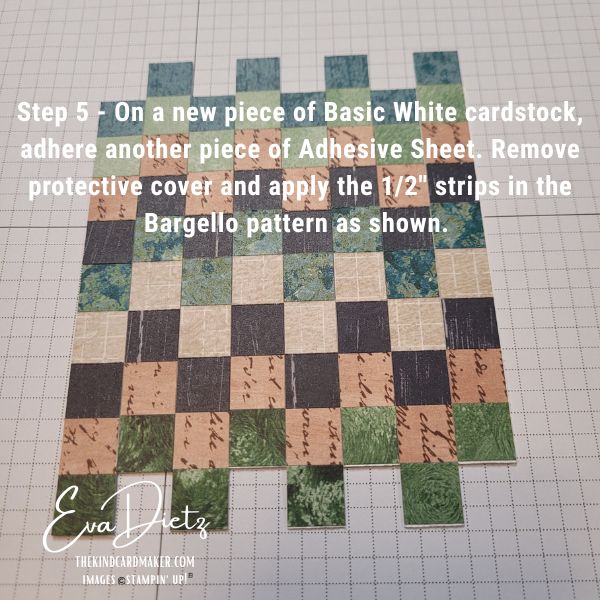
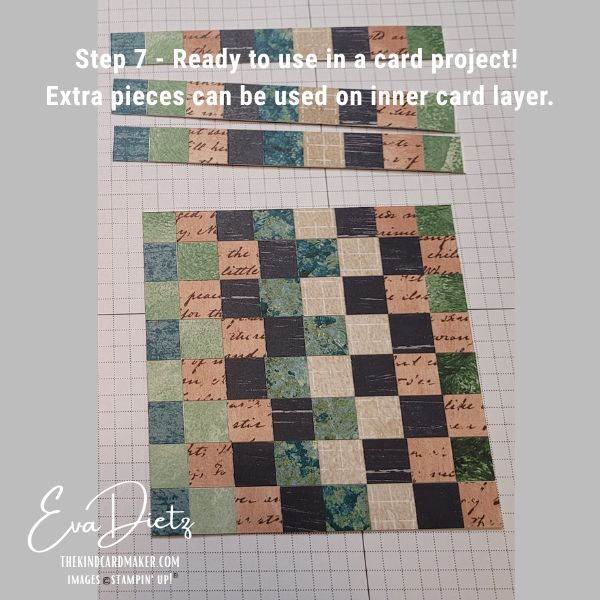
The Bargello Technique is created by layering strips of patterned Designer Series Paper and then cutting them again to create a pieced (like a quilt or checkerboard) effect. You really can start with any size of Basic White cardstock base as I did in the photos below, along with my linked YouTube video below.
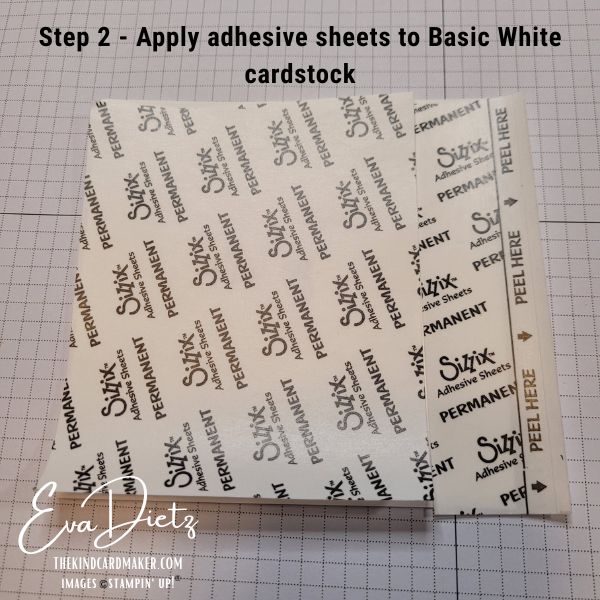
The key to this technique is simple: Cover your cardstock completely with your strips so no white shows through. From there, the magic happens when you re-cut and rearrange!


Six Different Variations to Explore:
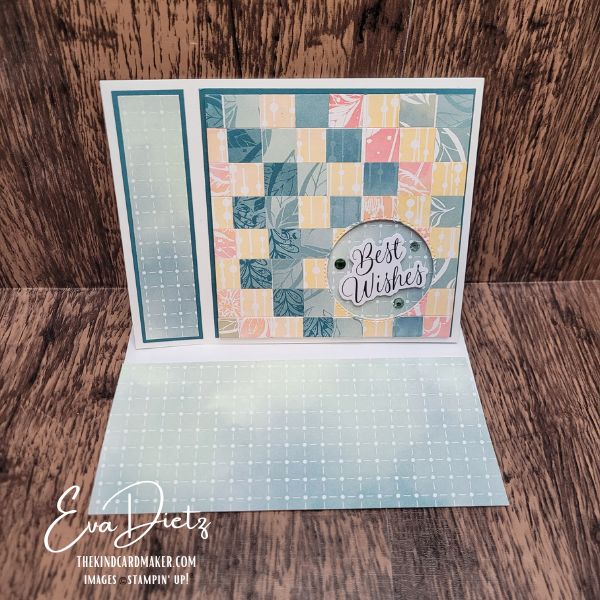
Card 1 – Best Wishes/Happy Anniversary Card
Muted tones for a calm, refined look!


Supplies Used
STAMPS – Reason to Celebrate
PAPER
- Basic White Cardstock
- Pretty Peacock Cardstock
- Hello Irresistible Designer Series Paper (DSP) (retired)
- Basic White Medium Envelope
INK – Pretty Peacock
DIES – Stylish Shape Dies (1 ¾”circle)
EPHEMERA – Greetings for All Mix and Match Ephemera Pack
EMBELLISHMENTS – Holiday Rhinestones (retired)
TOOLS –Paper Trimmer, Clear Stamp block D, Stampin’ Bone Folder, Adhesive Sheets, Seal Adhesive, Tombow Liquid Multipurpose Glue, Mini Dimensionals, Cut & Emboss Machine, Take Your Pick Tool, Paper Snips, Simply Shammy.
Cutting Measurements
- Basic White Cardstock for card base 4 1/4″” x 11” (score at 4 ½” and 5 ½”)
- Pretty Peacock DSP 1” x 4” and 4” square
- Hello Irresistible Designer Series Paper (DSP) (retired) – 11 assorted ½” strips at least 6” long, and 2” square for behind sentiment, and ¾” x 4 ¼” for inner layer.
- Basic White for Bargello Technique – (2 pieces) – 4 ¼” x 5 ½” and 4” square
- DSP Envelope Flap 2 ¼” x 6”
Step by Step Assembly
- Follow instructions above to make Bargello Technique and trim finished 4” square down to 3 7/8” square.
- Prepare Basic White card base. Burnish score lines with bone folder. With Tombow Glue adhere the “book binding” section to card back so it doesn’t open.
- With Stampin’ Seal, adhere Pretty Peacock cardstock pieces to card front. Also adhere 7/8” x 3 7/8” piece of DSP to Pretty Peacock on book binding section.
- You have a choice: 1) With your die cut machine, die cut the circle from your Bargello layer. It will be difficult, run the die back and forth multiple times. You may need an Exacto knife to cut through all the layers. Save the cut-out circle for use inside the card. OR 2) You can forgo the die cut circle and adhere your Bargello layer to the Pretty Peacock layer.
- If you chose #1 option: Adhere the small 2” square piece of DSP to the front Pretty Peacock layer. Then use Dimensionals to raise up the Bargello layer.
- Affix the “Best Wishes” Ephemera on Mini Dimensionals in the circle opening. Finish with embellishments of your choice or 3 Rhinestones.
- With Pretty Peacock Ink, stamp the Happy Anniversary sentiment inside the card.
- Adhere and trim the DSP for the Basic White Envelope to match.
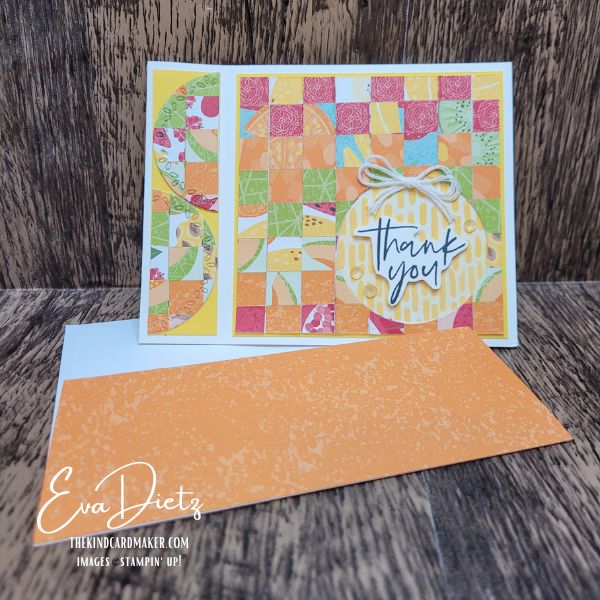
Card 2 – Thank You Card
Bold fruity colors for lots of energy!


Supplies Used
STAMPS – Fabulous Sayings
PAPER
- Basic White Cardstock
- Daffodil Delight Cardstock
- Fruit Salad Designer Series Paper (DSP) (retired)
- Basic White Medium Envelope
INK – Memento Tuxedo Black
DIES – Spotlight on Nature Dies (2 1/4”circle)
EMBELLISHMENTS – your choice, plus White Baker’s Twine for bow.
TOOLS –Paper Trimmer, Clear Stamp block D, Stampin’ Bone Folder, Adhesive Sheets, Seal Adhesive, Glue Dots, Tombow Liquid Multipurpose Glue, Mini Dimensionals, Cut & Emboss Machine, Take Your Pick Tool, Paper Snips, Simply Shammy.
Cutting Measurements
- Basic White Cardstock for card base 4 1/4″” x 11” (score at 4 ½” and 5 ½”), and two small scraps for fussy cut sentiments.
- Daffodil Delight cardstock 1” x 4” and 4” square
- Fruit Salad Designer Series Paper (DSP) (retired) – 11 assorted ½” strips at least 6” long, 2 1/2” square for behind sentiment, 3” square for inner circle, and ½”” x 4 ¼” for inner layer.
- Basic White for Bargello Technique – (2 pieces) – 4 ¼” x 5 ½” and 4” square
- DSP Envelope Flap 2 ¼” x 6”
Step by Step Assembly
- Follow instructions above to make Bargello Technique and trim finished 4” square down to 3 7/8” square.
- Prepare Basic White card base. Burnish score lines with bone folder. With Tombow Glue adhere the “book binding” section to card back.
- With Stampin’ Seal, adhere Daffodil Delight cardstock pieces to card front. Also adhere 1” x 4” piece of DSP to Daffodil Delight on book binding section.
- You have a choice: 1) With your die cut machine, die cut the circle from your Bargello Layer. It will be difficult, run the die back and forth multiple times. You may need a an Exacto knife to cut through all the layers. Save the cut-out circle for use on the narrow book binding section. OR 2) You can forgo the die cut circle and adhere your Bargello layer to the Daffodil Delight layer and choose a 7/8” x 3 7/8” piece of DSP for the book binding section instead.
- If you chose #1 option: Cut the removed Bargello circle in half and adhere to the Daffodil Delight in the book binding section.Adhere the small 2 1/2” square piece of DSP to the front Daffodil Delight layer. Then use Tombow Glue to adhere the Bargello layer flat to the Daffodil Delight.
- Stamp “Thank You” twice on scraps of Basic White. Fussy cut each out. With Mini Dimensionals affix one into the circle opening. Finish with embellishments of your choice and White Baker’s Twine Bow.
- Die cut the other DSP circle with the Spotlight on Nature die and then adhere ½” x 4 ¼” strip to inner card layer and then adhere die cut circle, then adhere “Thank You” with liquid glue to finish inner layer.
- Adhere and trim the DSP for the Basic White Envelope to match.
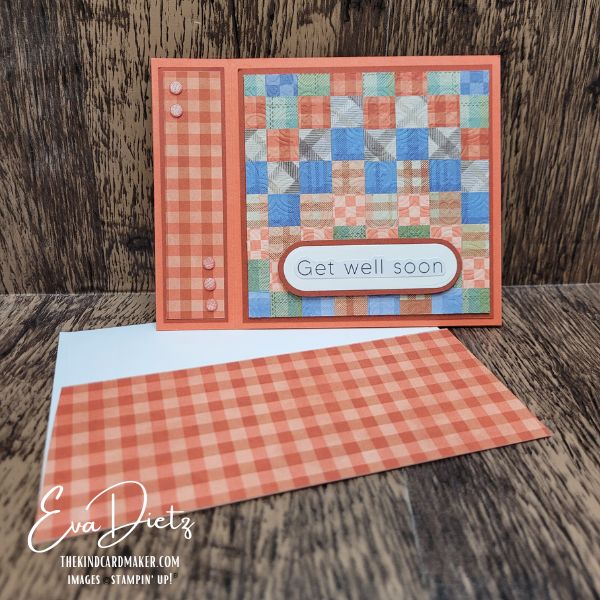
Card 3 – Get Well Soon
This plaid color layout is great for harder-to-make masculine cards.

Supplies Used
STAMPS – Handmade and Heartfelt Kit stamp set
PAPER
- Calypso Coral Cardstock
- Cajun Craze Cardstock
- Basic White Cardstock
- Petal Pink Cardstock for noses White Medium Envelope
INK – Cajun Craze
EMBOSSING FOLDER – Distressed Tile 3D
DIES – Lovely Arrangement Dies – oval
EPHEMERA – Greetings for All Mix and Match Ephemera Pack
EMBELLISHMENTS – your choice
TOOLS – Paper Trimmer, Clear Stamp block D, Stampin’ Bone Folder, Adhesive Sheets, Seal Adhesive, Tombow Liquid Multipurpose Glue, Dimensionals, Cut & Emboss Machine, Take Your Pick Tool, Paper Snips, Simply Shammy.
Cutting Measurements
- Calypso Coral Cardstock for card base 4 1/4″” x 11” (score at 4 ½” and 5 ½”)
- Cajun Craze cardstock 1” x 4” and 4” square, and one small scrap for tracing outside of oval die cut.
- Timeless Plaid Designer Series Paper (DSP) (retired) – 11 assorted ½” strips at least 6” long, 7/8” x 3 7/8”, and ½” x 4 ¼” for inner layer.
- Basic White for Bargello Technique – (2 pieces) – 4 ¼” x 5 ½” and 4” square, and scrap for die cut oval.
- DSP Envelope Flap 2 ¼” x 6”
Step by Step Assembly
- Follow instructions above to make Bargello Technique and trim finished 4” square down to 3 7/8” square. Using the Destressed Tile 3D, run Bargello section through Die Cut Machine for a fun texture.
- Prepare Calypso Coral card base. Burnish score lines with bone folder. With Tombow Glue adhere the “book binding” section to card back.
- With Stampin’ Seal, adhere Cajun Craze cardstock pieces to card front. Also adhere 7/8” x 3 7/8” piece of DSP to Cajun Craze on book binding section. Adhere Bargello section to card front.
- Prepare Tag for card front – trace oval on Cajun Craze and fussy cut out, die cut Basic White oval, adhere Ephemera to tag. Raise tag up on Dimensionals on card front.
- Apply Embellishments of your choice to card front.
- Stamp “Thinking of You” in Cajun Craze ink on 4” square Basic White and adhere to inner card. Add ½” DSP strip.
- Adhere and trim the DSP for the Basic White Envelope to match.
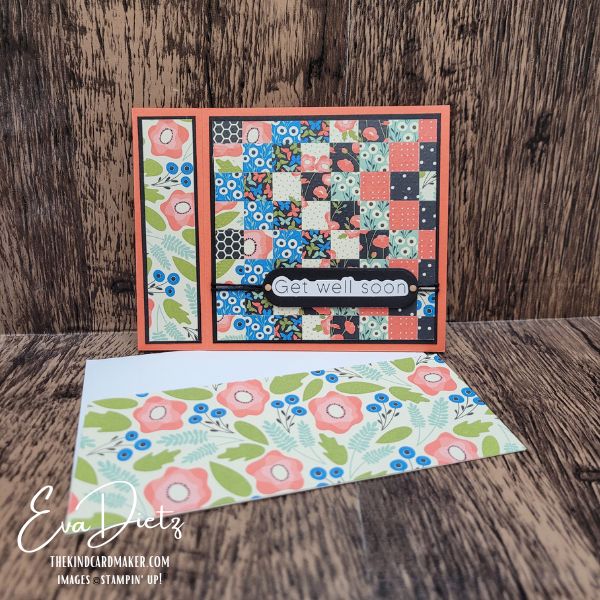
Card 4 – Get Well Soon
This high contrast using Basic Black will never go out of fashion!


Supplies Used
STAMPS – Handmade and Heartfelt Kit stamp set
PAPER
- Calypso Coral Cardstock
- Basic Black Cardstock
- Basic White Cardstock
INK – Calypso Coral
EMBOSSING FOLDER – Beautiful Dies Pattern
DIES – Lovely Arrangement Dies – oval
EPHEMERA – Greetings for All Mix and Match Ephemera Pack
EMBELLISHMENTS – your choice and Black Baker’s Twine
TOOLS – Paper Trimmer, Clear Stamp block D, Stampin’ Bone Folder, Adhesive Sheets, Seal Adhesive, Tombow Liquid Multipurpose Glue, Dimensionals, Cut & Emboss Machine, Take Your Pick Tool, Paper Snips, Simply Shammy.
Cutting Measurements
- Calypso Coral Cardstock for card base 4 1/4″” x 11” (score at 4 ½” and 5 ½”)
- Basic Black cardstock 1” x 4” and 4” square, and one small scrap for oval die cut.
- Pretty Petals Designer Series Paper (DSP) (retired) – 11 assorted ½” strips at least 6” long, 7/8” x 3 7/8”, and ½” x 4 ¼” for inner layer.
- Basic White for Bargello Technique – (2 pieces) – 4 ¼” x 5 ½” and 4” square
- DSP Envelope Flap 2 ¼” x 6”
Step by Step Assembly
- Follow instructions above to make Bargello Technique and trim finished 4” square down to 3 7/8” square. Using the Beautiful Dies Pattern embossing folder, run Bargello section through Die Cut Machine for a fun texture.
- Prepare Calypso Coral card base. Burnish score lines with bone folder. With Tombow Glue adhere the “book binding” section to card back.
- With Stampin’ Seal, adhere Basic Black cardstock pieces to card front. Also adhere 7/8” x 3 7/8” piece of DSP to Basic Black on book binding section. Wrap Black Baker’s Twine around Bargello layer twice. Affix with scotch tape on back of panel. Adhere Bargello section flat to card front.
- Prepare Tag for card front – Die cut Basic Black oval, adhere Ephemera to tag. Raise tag up on Dimensionals on card front.
- Apply Embellishments of your choice to card front.
- Stamp “Thinking of You” in Calypso Coral ink on 4” square Basic White and adhere to inner card. Add ½” DSP strip.
- Adhere and trim the DSP for the Basic White Envelope to match.
Card 5 – With Deepest Sympathy
This masculine sympathy card shows that any somber DSP can be used.
Supplies Used
STAMPS – Peaceful Moments cling stamp set (retired) and Timeless Tulips stamp set (retired)
PAPER
- Secret Sea Cardstock
- Crumb Cake Cardstock
- Basic White Cardstock
INK – Shaded Spruce and Memento Black Tuxedo Ink
EMBELLISHMENTS – your choice and Linen Baker’s Twine
TOOLS – Paper Trimmer, Clear Stamp block D, Stampin’ Bone Folder, Adhesive Sheets, Seal Adhesive, Tombow Liquid Multipurpose Glue, Dimensionals, Envelope Punch Board (retired), Take Your Pick Tool, Paper Snips, Simply Shammy.
Cutting Measurements
- Secret Sea Cardstock for card base 4 1/4″” x 11” (score at 4 ½” and 5 ½”)
- Crumb Cake cardstock 1” x 4” and 4” square.
- Nature Walk Designer Series Paper (DSP) – 11 assorted ½” strips at least 6” long.
- Basic White for Bargello Technique – (2 pieces) – 4 ¼” x 5 ½” and 4” square and scrap for tag about 1 1/2″ x 2″.
- DSP Envelope Flap 2 ¼” x 6”
Step by Step Assembly
- Follow instructions above to make Bargello Technique and trim finished 4” square down to 3 7/8” square.
- Prepare Secret Sea card base. Burnish score lines with bone folder. With Tombow Glue adhere the “book binding” section to card back. Adhere Basic White inner layer.
- With Stampin’ Seal, adhere Crumb Cake cardstock pieces to card front. Adhere 3 7/8″ square piece of Bargello to card front. Adhere 3/4″ x 3 7/8″ piece of Bargello to Book Binding section. Add 1/2″ x 4″ Bargello strip to inner Basic White layer.
- Prepare Tag for card front – Stamp scrap of Basic White with sentiment, then use the Envelope Punch Board corner rounder to round the tag corners. Affix Linen Thread to back. Raise tag up on Dimensionals, affix to card front. Also stamp sentiment on inner card layer.
- Apply Embellishments of your choice to card front.
- Adhere and trim the DSP for the Basic White Envelope to match.
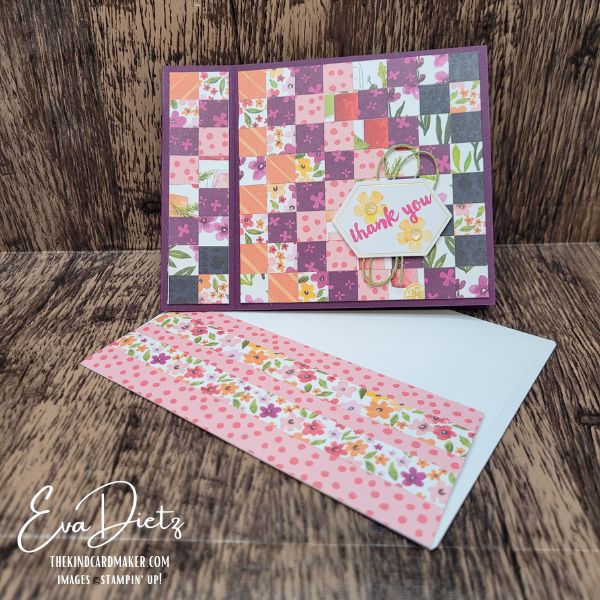
Card 6 – Thank You

Supplies Used
STAMPS – Use whatever you would like
PAPER
- Blackberry Bliss Cardstock
- Basic White Cardstock
- Any saved precut tag (mine was from a very old Paper Pumpkin kit)
INK – Melon Mambo and Daffodil Delight
EMBELLISHMENTS – your choice and Mossy Meadow Baker’s Twine
TOOLS – Paper Trimmer, Clear Stamp block D, Stampin’ Bone Folder, Adhesive Sheets, Seal Adhesive, Tombow Liquid Multipurpose Glue, Dimensionals, Take Your Pick Tool, Paper Snips, Simply Shammy.
Cutting Measurements
- Blackberry Bliss Cardstock for card base 4 1/4″” x 11” (score at 4 ½” and 5 ½”)
- Celebratory Sips Designer Series Paper (DSP) (retired) – 11 assorted ½” strips at least 6” long.
- Basic White for Bargello Technique – (2 pieces) – 4 ¼” x 5 ½” and 4” square
- DSP Envelope Flap 2 ¼” x 6”
Step by Step Assembly
- Follow instructions above to make Bargello Technique and trim finished 4” square.
- Prepare Blackberry Bliss card base. Burnish score lines with bone folder. With Tombow Glue adhere the “book binding” section to card back.
- Affix 4″ square Bargello piece to card front. Affix 1″ x 4″ Bargello piece to Book Binding section.
- Attach Mossy Meadow Baker’s Twine to back of pre stamped and pre cut tag. Affix tag to card front.
- Apply Embellishments of your choice to card front.
- Adhere 4” square Basic White and adhere to inner card. Add ½” DSP strip.
- Adhere and trim the DSP for the Basic White Envelope to match.
Watch the Tutorial
Prefer to see it in action? Watch the full step-by-step tutorial below. Please subscribe to my channel and click the bell to be notified when I upload a new video!
Final Thoughts
There’s something really satisfying about taking small scraps and turning them into something that looks this detailed and intentional.
This is one of those techniques where once you try it, you’ll start looking at your paper stash completely differently—and that’s a good thing.
If you’re ready to create your own Bargello styled cards, take a look through your stash and start cutting those strips!
Keep the Creativity Going
If you enjoyed learning this technique and making these cards, here are a few ways we can keep creating together:
Download the free printable tutorial
Get a step-by-step version of this project you can save or print for later.
Join my email list for more step-by-step inspiration
Join my Email List and choose a free card tutorial as my thank-you gift.
Try a monthly creative kit
Paper Pumpkin is a fun all-in-one crafting kit that shows up ready to create.
Looking for retired favorites?
Browse my Etsy Shop for retired Stampin’ Up! products and special crafty finds.
Shopping with me has perks
Orders of $50 or more earn Loyal Shopper Rewards toward a future crafting spree.
Share in the comments which of these six cards is your favorite!
Happy crafting,


0 Comments