This Masculine Pinwheel Quilt Card Technique Efficiently Uses Designer Series Paper Well
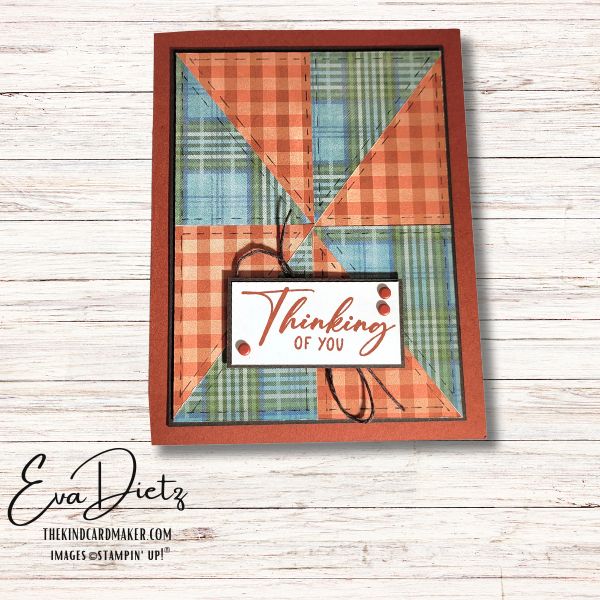
If you’ve ever looked at your Designer Series Paper stash and thought, “I love you… but I have way too much of you,” this Masculine Pinwheel Quilt Card is about to become your new favorite technique. The pinwheel quilt layout is bold, balanced, and just rugged enough to feel right for masculine cards—without being boring or flat.
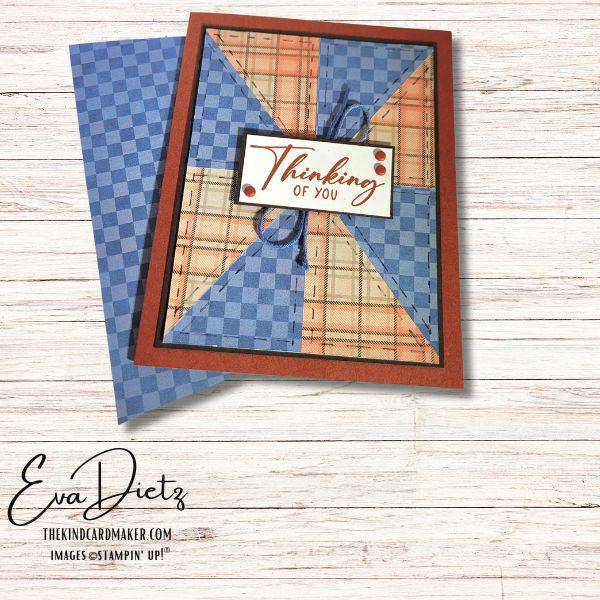
Best of all, it’s a smart, satisfying way to use up coordinating DSP pieces that might otherwise sit untouched. You get maximum impact with minimal waste, and every card feels intentional, polished, and handmade in the best way. Plus to can create two completely different cards using the exact same sheets of DSP by pairing the reverse sides together for another card. Two cards done with hardly any extra time spent is a WIN!

I’ve included this photo below to help you see the products I’m highlighting below.

Supplies:
- Stamps: Small stamp set from the Handmade and Heartfelt Kit
- Cardstock/Paper: Cajun Craze, Early Espresso, Basic White, Timeless Plaid Designer Series Paper (DSP)
- Stampin’ Pads: Cajun Craze
- Embellishments: Baker’s Twine in Misty Moonlight and Early Espresso, Earthy Matte Dots
- Other: Pencil, Ruler, Retired Basic Black Stampin’ Write Marker (has a finer tip for stitching lines than the current similar marker or try a fine-tip black Sharpie, or this Stampin Up! option – Black 0.4mm Stampin’ Journaling Pens, Small T square ruler (can purchase one from Amazon – it really helps in placing your hand drawn stitching lines because you can align it with the edge of the cardstock), Paper Trimmer, Stampin’ Bone Folder, Dimensionals, Stampin’ Seal or Adhesive of your Choice, Scotch Tape, Scissors, Take Your Pick Tool, Clear Acrylic Stamp Block D, Simply Shammy, Basic White Medium Envelope
Cutting and Scoring Instructions for 1 Card:
- Cajun Craze: (card base) 8 1/2″ x 5 1/2″, scored at 4 1/4″
- Early Espresso: (layer) 3 3/4″ x 5″
- Early Espresso: (tag base) 2 1/4″ x 1 1/8″
- Basic White: (quilt base) 3 3/4″ x 5″ (trim to 3 5/8″ x 4 7/8″ after adding DSP)
- Basic White: (inner layer) 4″ x 5 1/4″
- Basic White: (sentiment tag) 2 1/8″ x 1″
- DSP: (2 each of two different prints) 1 7/8″ x 2 1/2″
- DSP: (inner layer) two strips cut at 1/4″ x 5 1/4″
- DSP: (envelope flap) 2 3/8″ x 6″


Assembly Instructions:
- With the cut Cajun Craze card base, score at 4 1/4″ and burnish with Bone Folder. Adhere Basic White inner layer, followed by the two 1/4″ DSP strips.
- With DSP for quilt pieces and Paper Trimmer do the following: take two pieces of the same print and flip of the pieces one over, so the backside is up. Cut both at the same time, cutting diagonally from top left to bottom right. Tip – after aligning your designated corners on the cutting track of the paper trimmer, move the blade to the middle of the rectangle and cut both directions (up and down) to keep from damaging the ends of your DSP. Then repeat this process a second time with the other two pieces of DSP print.
- With your pencil and ruler lightly draw a vertical line in the middle of the Basic White quilt base at 1 5/8″. Then draw a horizontal line at 2 1/2″. Having the “cross” there will help you place your quilt pieces precisely.
- Arrange the pieces according to the photos on the Basic White quilt base. Carefully adhere each piece so they align to your pencil lines, making sure the triangles tips meet at the “cross” intersection and that each triangles side is on a pencil line or edge of the base layer.
- After adhering all the DSP (let the glue dry a bit if using a liquid glue) trim the quilt layer to 3 5/8″ x 4 7/8″ by cutting 1/16″ off each top and side (that way you will keep your quilt “block” centered.
- Using the small T square, align it to one side of the quilt block and draw short stitching lines on all edges of the DSP with Black pen of your choice. Pay attention to leave a little space at each corner, so it looks like “real” stitching (use photos for reference).
- Adhere quilt block to Early Espresso layer, then to card front.
- On small Basic White tag piece stamp the sentiment in Cajun Craze ink. Then adhere to Early Espresso tag base. Next tie a large-ish bow with the Early Espresso Baker’s Twine (or Misty Moonlight depending on which card you are making) and scotch tape to the back of the tag. Then add two Dimensionals and affix to card front in your choice of locations.
- Finish project by affixing the embellishments and adhering the DSP to the envelope flap and trimming off excess with scissors.
Why This Pinwheel Quilt Card Just Works
This pinwheel quilt design proves that masculine cards don’t have to be complicated—or dull—to be meaningful. With a few well-chosen patterns and clean assembly, you create a card that feels strong, thoughtful, and intentional—perfect for those occasions that call for something less frilly and more grounded.
What makes this design especially satisfying is that it solves several common cardmaking challenges at once. You’re learning a versatile, repeatable technique you can use all year long. You’re putting your Designer Series Paper stash to work in a coordinated, purposeful way.
And you’re building confidence in creating masculine cards—something many crafters find surprisingly tricky. When one project teaches a skill, reduces creative clutter, and removes decision fatigue, cardmaking stays joyful instead of overwhelming.
Try This Technique Yourself!
Now it’s your turn. Pull out a favorite DSP pack, try this pinwheel quilt layout, and see how many different looks you can create just by changing patterns and colors. When you make one—or a whole stack—I’d love to see them. Leave a comment, share your version, or save this post so it’s ready the next time you need a go-to masculine card that truly feels handmade. And if you’re ready for more easy, thoughtful cardmaking ideas, be sure to explore the other tutorials here on The Kind Card Maker.
Keep the Creativity Going
If you enjoyed learning this technique and making these cards, here are a few ways we can keep creating together:
Download the free printable tutorial
Get a step-by-step version of this project you can save or print for later.
Get more card ideas in your inbox
Join my email list and choose a free card tutorial as my thank-you gift.
Try a monthly creative kit
Paper Pumpkin is a fun all-in-one crafting kit that shows up ready to create.
Looking for retired favorites?
Browse my Etsy shop for retired Stampin’ Up! products and special crafty finds.
Want to create these cards too?
I’ve put together a handy shopping list so you can find the exact supplies from this tutorial in one place.
Shopping with me has perks
Orders of $50 or more earn Loyal Shopper Rewards toward a future crafting spree.
Some of the links above are shopping links to my Stampin’ Up! store. If you choose to order through them, I may earn a small commission at no extra cost to you — and I truly appreciate your support of my small business.
Happy crafting,


0 Comments