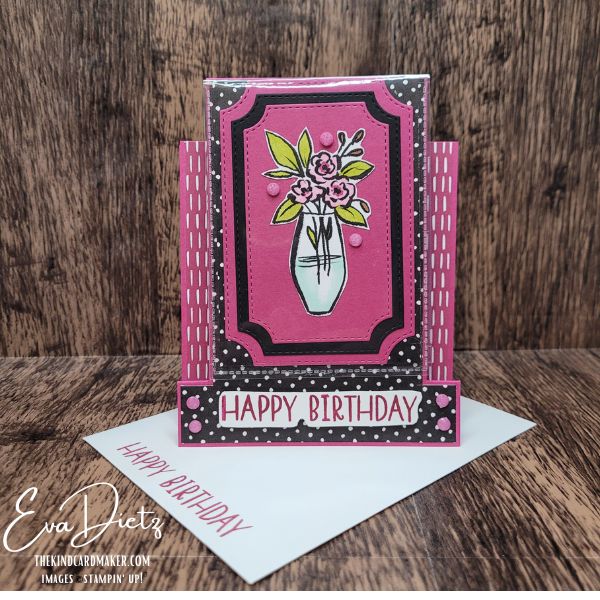
If you’re ready to create a handmade card that truly wows, this Flip Flap Easel Card is going to be such a fun project to try! This design combines a beautiful easel fold with a hidden surprise element using a Flip Flap pocket—something typically used in scrapbooking, but reimagined here in a fresh and creative way.
While this project leans a bit more toward the intermediate side, don’t let that stop you. I’ll walk you through the process step-by-step so you can confidently recreate this stunning birthday card. The bold combination of Berry Burst and Basic Black, paired with the elegant floral images from the Artisan Sketched Garden Designer Series Paper, creates a card that feels both artistic and meaningful.
Why This Card is Special
This card stands out because it combines beauty, structure, and surprise all in one design.
- The Flip Flap pocket adds a hidden layer that can hold a gift card or cash
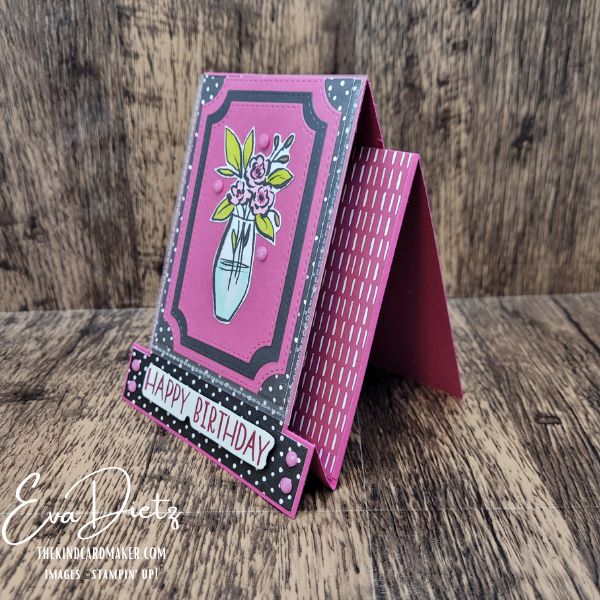
- The standing easel design turns your card into a display piece
- You can even tuck an extra stamped message or floral layer behind the flap for a second surprise
❤️ This card is perfect because it looks like a boutique-style keepsake but is completely handmade by you—with a hidden surprise your recipient won’t expect!
👉 This is the kind of card people keep on display—not tuck away in a drawer.
Stampin’ Up! Supplies:
STAMPS: 2026 Virtual Card Making Retreat stamp set or substitute set
PAPER:
- Berry Burst Cardstock
- Basic Black Cardstock
- Basic White Cardstock
- Artisan Sketched Garden Designer Series Paper (DSP)
- Berry Burst 6” x 6” Brights collection DSP (retired) or substitute
- Basic White Medium Envelope
DIES – Branching Out Dies – of the 6 dies in the set you will use the 2nd, 3rd, 4th dies from the smallest to the largest in size
ACCESSORY – 3” x 4” Flip Flaps (use the one that is 3” wide by 4” long, adhesive is on the 3” side)
INK – Berry Burst
STAMPIN’ BLENDS – Pool Party Light, Bubble Bath Set, Berry Burst Dark, Pecan Pie Dark, Lemon Lime Twist Dark, Old Olive Light
You may also need a Basic Black Stampin’ Write Marker to fill in portions of the floral vases to your liking.
ADHESIVE – Non Stampin’ Up! – Amazon Art Glitter Glue with additional needle nose tip and stainless steel pin to “cap” the glue when not in use.
EMBELLISHMENT – Charming Shimmer Faceted Dots (Retired) or substitute
TOOLS – Clear Stamp Block H, Paper Trimmer, Cut & Emboss Machine, Small Scissors for Fussy Cutting,
Mini Dimensionals, Bone Folder, Take Your Pick Tool, Simply Shammy

Cutting and Scoring Details:
- Berry Burst Cardstock – 4/1/4 X 11”, 2 ½” x 3 ¾”, 3” x 4 ½”, 4 ¼” 4 ⅜”
- Basic Black Cardstock – 2 ¾” 4 ¼”
- Basic White Cardstock – 4 ⅛” x 4 ⅜”, Tag ¾” x 4”
- Artisan Sketched Garden Designer Series Paper (DSP) – 2 fussy cut flowers of your choice, Black Polka Dot – See Diagram for cutting Easel Layer 4 ⅛” x5 ⅜”, 3” x 4 3/16”,⅞” x 3 ⅛”, 2 pieces ½” x 4 ⅛”, Envelope Flap – 2 ¼” x 6”
- Berry Burst 6” x 6” retired Brights collection – 4 ⅛” x 4 ⅜” or substitute
Step by Step Assembly:
- Prepare Berry Burst Card Base, score and cut as shown on diagram below. Burnish score lines with bone folder. The solid black lines are cutting lines; dashed lines are scoring lines. The amount to slice open is a ½” width in on each side of the base starting at 4 ½’ down to 10” on the front side.

- Prior to attaching the Flip Flap, with scissors cut off a small, angled piece on each side of the adhesive strip. That way the Flip Flap will not show once the DSP layer is adhered. Attach Flip Flap pocket by folding back the adhesive portion so it aligns with the top fold of the easel. Make sure the opening to slide the artwork in is on the inner side of the Flip Flap, not on the front side.
- Prepare and cut the front piece of Black Polka Dot DSP as shown in diagram above.
- Adhere Black Polka Dot DSP to card front to cover and hide the adhesive portion of the Flip Flap.
- Adhere Berry Burst DSP piece to the Berry Burst cardstock piece allowing for 1/16” margins on both left and right sides. Then slide this panel in behind the main front panel where the Flip Flap is, but on top of the two narrow ½” strips on each side of the front panel. While carefully holding this extra panel in place, apply glue to the ½” strips only, one side at a time. This extra panel will make the entire card very stable and strong.
- Chose two of the floral arrangements on the DSP, cut them from the main DSP sheet and color using the Stampin’ Blends Alcohol Markers from the list. Then fussy cut the arrangements out.
- Die cut the 3 cardstock layers that the front floral vase will go on using the Branching Out Dies – you will use the 2nd (Berry Burst), 3rd (Basic Black), 4th dies (Berry Burst) from the smallest to the largest in size.
- Carefully adhere and align the three die cut cardstock layers. Center and adhere the fussy cut vase to the top Berry Burst layer. Take the 3” x 4 3/16” Black Polka Dot DSP piece and adhere the combined 4 layers to the DSP aiming for even side margins. When dry, slide into the Flip Flap pocket.
- For the Happy Birthday tag, trace the back of the birthday stamp with a mechanical pencil on the back of the Basic White cardstock strip. Fussy cut on your pencil line. Flip tag over and after placing your stamp on a clear stamp block, ink with Berry Burst ink and carefully align on precut tag. Use 5 mini Dimensionals and adhere tag to front of easel under the Flip Flap portion as shown in photo.
- Flip Easel Card over and adhere the small section of the Black Polka Dot DSP to the top of the back.
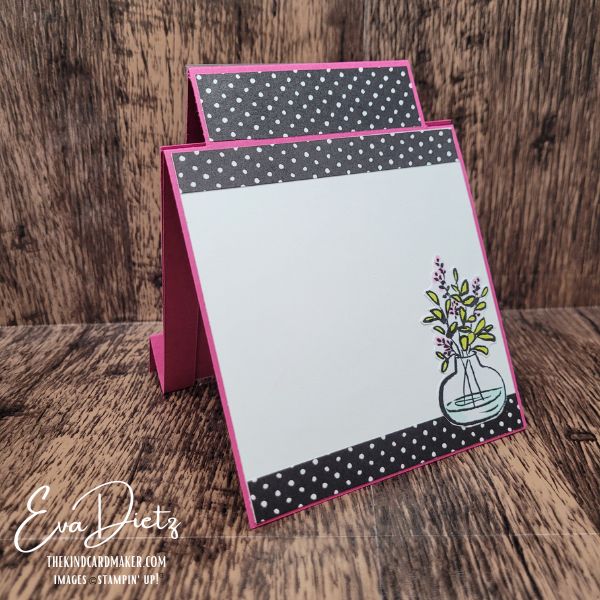
- On the Basic White layer, adhere the narrow Black Polka Dot strips to the top and bottom as shown in photo. Adhere the second fussy cut floral vase on the back sitting on top of the lower polka dot strip. Then adhere the finished piece to the back of the card base.
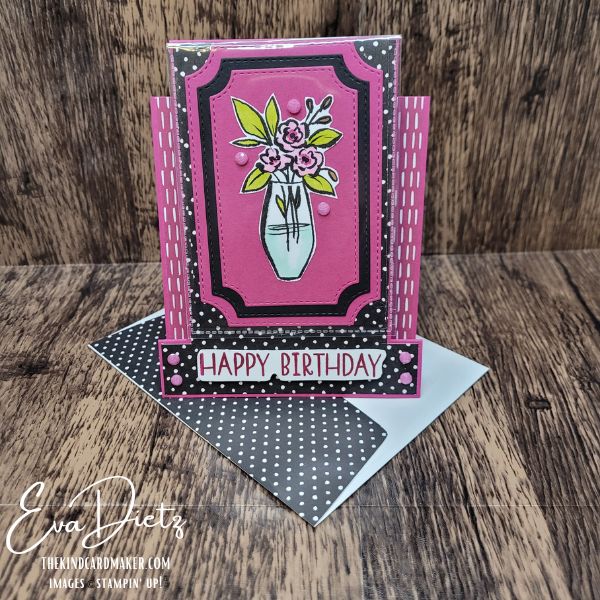
- 7 Berry Burst embellishments are applied to the easel front. Two on each side by the birthday greeting and 3 forming a visual triangle on the plastic of the Flip Flap pocket.
- Adhere and trim the DSP for the Basic White Envelope to match. With the Happy Birthday stamp and Berry Burst ink, stamp the left side of the envelope front, so the greeting is sitting close to the left side edge of the envelope (see first photo for reference.)
BONUS – The Flip Flap pocket will hold a gift card easily if you’d like to surprise someone. You are also encouraged to add another greeting amd colored floral vase underneath the Flip Flap on the inner easel front to be an additional surprise when the card is opened.
Video Tutorial for Visual Learners
Prefer to see it in action? Watch the full step-by-step tutorial below. Please subscribe to my channel and click the bell to be notified when I upload a new video!
Final Thoughts
There’s something so special about giving a card that goes beyond the expected, and this Flip Flap Easel Card does exactly that. It’s thoughtful, interactive, and full of little details that show how much you care. Once you’ve made one, you’ll start imagining all the ways you can customize it for different occasions and color combinations.
If you enjoyed this project, I’d love to hear from you!
💬 Leave a comment and tell me—would you use the Flip Flap for a gift card or a hidden message?
Let’s keep spreading kindness—one handmade card at a time 💛
Keep the Creativity Going
If you enjoyed learning this technique and making these cards, here are a few ways we can keep creating together:
Download the free printable tutorial
Get a step-by-step version of this project you can save or print for later.
Get more card ideas in your inbox
Join my Email List and choose a free card tutorial as my thank-you gift.
Try a monthly creative kit
Paper Pumpkin is a fun all-in-one crafting kit that shows up ready to create.
Looking for retired favorites?
Browse my Etsy Shop for retired Stampin’ Up! products and special crafty finds.
Want to create these cards too?
I’ve put together a handy Shopping List so you can find the exact supplies from this tutorial in one place.*
*The products used in this project were available while filming the video and writing this blog post. If something does not show in the list, it is no longer available. Feel free to be creative and make your own substitutions from what you may have on hand.
Shopping with me has perks
Orders of $50 or more earn Loyal Shopper Rewards toward a future crafting spree.
Some of the links above are shopping links to my Stampin’ Up! store. If you choose to order through them, I may earn a small commission at no extra cost to you — and I truly appreciate your support of my small business.
Happy crafting,


0 Comments