
If you enjoy making cards that surprise people when they open the envelope, today’s project is one you’ll definitely want to try!
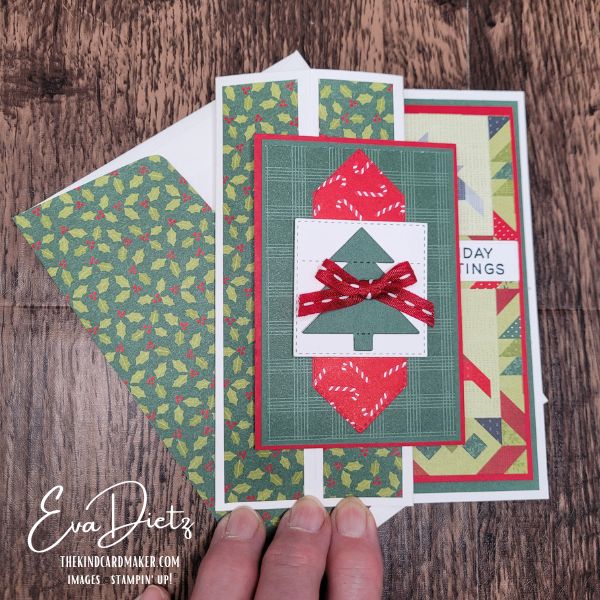
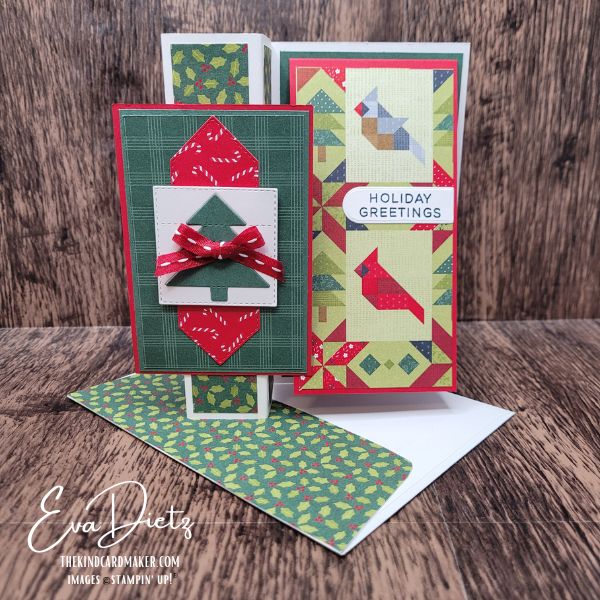
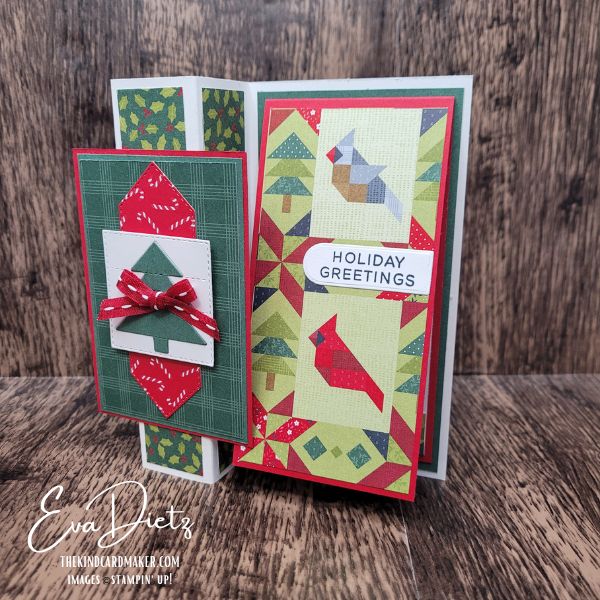
This Pop-Up Pillar Christmas Card combines two fun folds into one unique design. The square Pop-Up Pillar creates wonderful dimension while the Skinny Tent Fold on the front provides the perfect place to showcase a favorite focal image.
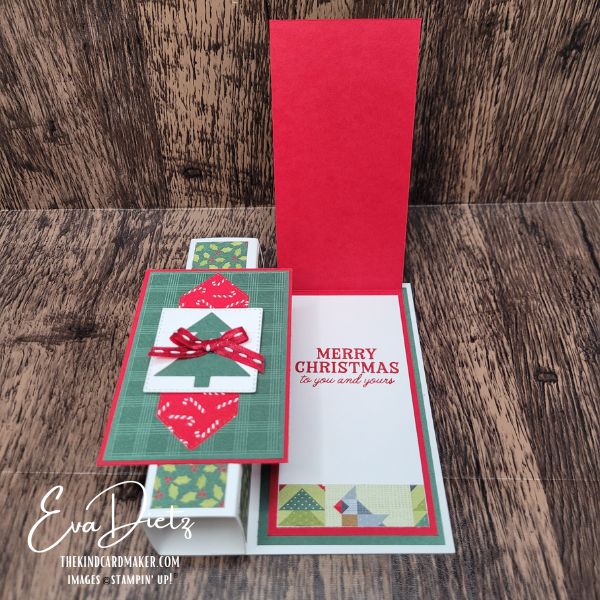
Although it looks quite impressive when standing on display, the card folds completely flat for mailing in a standard envelope.
The holiday papers, cheerful Christmas tree, birds and cardinals make this design perfect for sending warm Christmas wishes to family and friends.
Whether you’re making one special card or several for your holiday card list, this fold is easier than it first appears.
Why You’ll Love This Card Idea
- Folds flat for mailing
- Displays beautifully on a table or mantel
- Great way to showcase Designer Series Paper
- Perfect for Christmas or easily adapted for other occasions
- Beginner-friendly once you understand the folds
Supplies Used
- PHOTOPOLYMER STAMPS – Stitched Stocking Stamp Set, Woodland Wishes Stamp Set
- CARDSTOCK/DESIGNER PAPER: Basic White Cardstock, Peaceful Pine Cardstock, Real Red Cardstock, A Stitched Season Designer Series Paper (DSP), and Basic White Medium Envelope
- STAMPIN’ CLASSIC INK PAD – Secret Sea, Real Red
- DIES –Stitched Stocking Dies, Scalloped Bloom Dies for small tag
- RIBBON – Real Red ¼” Stitched Ribbon
- TOOLS – Paper Trimmer, Clear Stamp block D, Stampin’ Bone Folder, Seal Adhesive, Glue Dots, Multipurpose Liquid Adhesive, Dimensionals, Cut & Emboss Machine, Take Your Pick Tool, Paper Snips, Simply Shammy.
Cutting Measurements
- Basic White Cardstock: (card base) 8 1⁄2” x 5 1⁄2”, scored at 1⁄2”, 1 3⁄4”, 3”, 4 1⁄4”
- A Stitched Season DSP – Holly pattern 3 pieces 1” x 5 ¼”
- Peaceful Pine Cardstock layer 2 ¾” x 5 ¼”
- Real Red Cardstock 2 ½” x 10”, scored at 5”
- Basic White Cardstock inner layer 2 ¼” x 4 ¾”
- A Stitched Season DSP – Birds pattern for cover 2 3/8” x 4 3⁄4” and inner strip 5/8” x 2 1/4”
- Basic White Cardstock for tag 1” x 2”
- Real Red Cardstock for pop-up panel 2 5/8” x 3 7/8”
- Peaceful Pine Cardstock for pop-up panel 2 ½” x 3 ¾”
- A Stitched Season DSP – Peaceful Pine Plaid pattern 2 3/8” x 3 5/8”
- A Stitched Season DSP – Candy Cane pattern 1 ½ x 4”
- Basic White Cardstock for Tree die cut square 2” x 2”
- Peaceful Pine Cardstock for Tree die cut square 2” x 2”
- A Stitched Season DSP – Holly pattern (envelope) 6” x 2 1⁄2”
Step by Step Assembly
- With the Basic White card base burnish the 4 score lines with bone folder. Practice folding into the square pillar as shown in the attached photos. To adhere, apply adhesive to the back side of the 1⁄2” panel only. Fold the left two panels to the inside, lay the card flat, and press down to secure. This will form the square pillar. Make sure that the card lies flat.
- Adhere the three 1” x 5 1⁄4” pieces of DSP to the three panels of the card base.
- Adhere the Peaceful Pine layer to the right of the pillar allowing for 1/8” margins.
- Adhere the Real Red tent folded layer to the Peaceful Pine layer.
- With the Basic White inner layer, stamp the greeting in Real Red ink. Also adhere the DSP strip at the bottom. Adhere the Basic White inner layer to the Real Red cardstock backing.
- Adhere the Birds DSP layer to the front of the Real Red “flap”.
- With Secret Sea ink stamp the “Holiday Greetings” from the Woodland Wishes stamp set on the Basic White scrap, then die cut using the Scalloped Bloom die. Align and adhere flat to the edge of tag with edge of DSP as shown in photos.
- Assemble the focal pillar layers by adhering the Peaceful Pine cardstock to the Real Red cardstock. Add the Peaceful Pine DSP piece on top.
- Die cut the Candy Cane pattern using the double pointed die from the Stitched Stocking Dies. Then die cut the “tree quilt square” from Basic White and Peaceful Pine cardstock squares. Carefully snip and remove the tree shape from the Peaceful Pine and adhere it on top of the tree portion of the Basic White quilt square.
- Position and adhere the Candy Cane pattern die cut in the center of the focal point. Then add the “tree square” using Dimensionals, centering as well.
- Tie a small bow from the Real Red ¼” Stitched Ribbon and trim ends diagonally. Using a Glue Dot affix to center of tree.
- Adhere A Stitched Season DSP Holly pattern to the envelope flap and trim off.
Assembly Tips
The most important step is carefully burnishing all four score lines before assembling the pillar. Taking a few extra moments here helps the card stand nicely while still folding flat.
When creating the front Skinny Tent Fold, be sure to center your focal layers before attaching the dimensional embellishment. A small ribbon bow adds the perfect finishing touch without making the card bulky for mailing.
Make It Your Own
This layout would also be beautiful for:
- Winter birthdays
- Masculine cards
- Nature themes
- Autumn leaves
- Floral collections
- Valentine’s Day
- Baby cards
Simply change the designer paper and sentiment.

Final Thoughts
I hope this project inspires you to try a new fun fold. Cards like this always bring smiles because they’re interactive without being difficult to create.
If you make one, I’d love to know what papers and stamps you choose!
Keep the Creativity Going
If you enjoyed learning this technique and making these cards, here are a few ways we can keep creating together:
Download the free printable tutorial
Get a step-by-step version of this project you can save or print for later.
Get more card ideas in your inbox
Join my Email List and choose a free card tutorial as my thank-you gift.
Try a monthly creative kit
Paper Pumpkin is a fun all-in-one crafting kit that shows up ready to create.
Looking for retired favorites?
Browse my Etsy Shop for retired Stampin’ Up! products and special crafty finds.
Want to create these cards too?
I’ve put together a handy Shopping List so you can find the exact supplies from this tutorial in one place.*
*The products used in this project were available while filming the video and writing this blog post. If something does not show in the list, it is no longer available. Feel free to be creative and make your own substitutions from what you may have on hand.
Shopping with me has perks
Orders of $50 or more earn Loyal Shopper Rewards toward a future crafting spree.
Some of the links above are shopping links to my Stampin’ Up! store. If you choose to order through them, I may earn a small commission at no extra cost to you — and I truly appreciate your support of my small business.
Happy crafting,


0 Comments