If you love handmade cards that look polished but don’t require hours at your craft table, this project is for you. Today’s quick and easy all-occasion cards features Stampin’ Up! Products of the Month from December and January, proving that coordinated products make cardmaking simpler—and more fun to make.
Why You’ll Love These Card Ideas
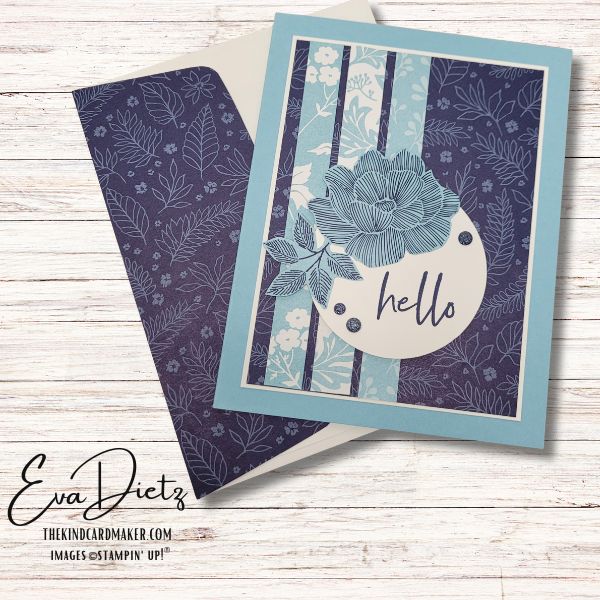
With layered Designer Series Paper, a clean focal greeting, and a soothing color palette, this card design works beautifully for birthdays, thank-yous, thinking-of-you cards, and so much more. Best of all, it’s a repeatable layout you’ll reach for again and again when you need a card fast.

Supplies Used
- STAMPS – Fabulous Sayings (January 2026 SU Product of the Month) #167972
- PAPER
- Balmy Blue Cardstock
- Basic White Cardstock
- True Blue Florals Designer Series Paper (DSP) (December 2025 SU Product of the Month) #167970
- Basic White Medium Envelope
- INK – Night of Navy Ink
- PUNCH – 2 3/8” Circle Punch
- EMBELLISHMENTS – Retired Charming Shimmer Faceted Dots- 3 in Night of Navy
- TOOLS –Paper Trimmer, Clear Stamp block D, Stampin’ Bone Folder, Seal Adhesive, Dimensionals, Take Your Pick Tool, Paper Snips, Simply Shammy.

Images (c) Stampin’ Up!

Cutting Measurements
- Balmy Blue Cardstock – Card base 5 ½” x 8 ½”, Score at 4 ¼”
- Basic White Cardstock – Outer Layer 3 5/8” x 4 7/8”, Punched Circle Tag 2 ¾” square,
- Inner Layer 3 ½” x 4 ¾”
- True Blue Florals Designer Series Paper (DSP) (December 2025 SU Product of the Month) – Outer Layer 3 ½” x 4 ¾”, 3 Outer strips (assorted patterns) ½” x 4 ¾”, Inner Layer 4” x 5 ¼”, Inner strip ½” x 4 ¾”, Envelope Flap 2 ¼” x 6”, plus two fussy cut florals from the DSP of your choice


Step by Step Assembly
- Prepare Balmy Blue Card Base, score as noted above.
- Adhere outer Basic White layer.
- Adhere outer True Blue Florals DSP layer.
- Adhere the 3 strips from left to right, leave a ¼” margin on the DPS, then 1/8” between the strips.
- Punch the Basic White circle.
- Stamp sentiment of your choice with Night of Navy ink.
- Adhere your chosen fussy cut floral to upper portion of circle, so the circle and flower become one unit.
- With Dimensionals, adhere the combo unit to the card front as shown.
- With Take Your Pick tool affix embellishments.
- Open card and adhere the DSP inner layer.
- With inner Basic White layer adhere DSP strip to left side, then adhere to DSP layer. Adhere fussy cut floral image on strip.
- Adhere and trim the DSP for the Basic White Envelope to match.


Watch the tutorial for Quick and Easy All-Occasion Cards
*The products used in this project were available while filming the video and/or writing this blog post. If something does not show in the list, it is no longer available. Feel free to be creative and make your own substitutions from what you may have on hand.
Final Thoughts
One of the best things about Stampin’ Up!’s Products of the Month is how effortlessly they work together—and this card is a perfect example. With just a few paper strips, a simple sentiment, and thoughtfully chosen embellishments, you’ve created a card that feels intentional without being complicated. This is the kind of design that builds confidence, uses your supplies wisely, and reminds you that handmade doesn’t have to mean hard.
If you enjoyed this quick and easy all-occasion card, be sure to grab the free tutorial below—you can swap out colors, sentiments, or Designer Series Paper to match any season or occasion. Scroll down to grab the shopping list, and don’t forget to leave a comment letting me know what sentiment you would use on this card. Your ideas inspire others more than you know 💛
Keep the Creativity Going
If you enjoyed learning this card layout and making these cards, here are a few ways we can keep creating together:
Download the free printable tutorial*
Get a step-by-step version of this project you can save or print for later.
Get more card ideas in your inbox
Join my Email List and choose a free card tutorial as my thank-you gift.
Try a monthly creative kit
Paper Pumpkin is a fun all-in-one crafting kit that shows up ready to create.
Looking for retired favorites?
Browse my Etsy Shop for retired Stampin’ Up! products and special crafty finds.
Want to create these cards too?
I’ve put together a handy Shopping List so you can find the exact supplies from this tutorial in one place.*
*The products used in this project were available while filming the video and writing this blog post. If something does not show in the list, it is no longer available. Feel free to be creative and make your own substitutions from what you may have on hand.
Shopping with me has perks
Orders of $50 or more earn Loyal Shopper Rewards toward a future crafting spree.
Some of the links above are shopping links to my Stampin’ Up! store. If you choose to order through them, I may earn a small commission at no extra cost to you — and I truly appreciate your support of my small business.
Happy crafting,


0 Comments