


Have you ever wished your dies came in just one more size? You’re not alone!
In today’s post, I’m sharing ways to stretch simple dies for cardmaking success. There are several simple and creative ways to stretch the dies you already own, so you can create beautiful layered elements without needing a full coordinating die set. These techniques are perfect for adding polished detail to your handmade cards while keeping things easy and budget-friendly.
Supplies
Stamps
- Sentiment stamps used in this project (e.g., “With All My Love” from Love Story stamp set, “Happy Anniversary” from Reason to Celebrate stamp set, ” You’re On My Mind” from Fabulous Sayings stamp set, and “Thank You” from Lovely Arrangements)
Paper
- Basic White Cardstock
- Coordinating Cardstocks
- Designer Series Papers (DSP) or DSP scraps
Tools
- Die cutting machine
- Standalone dies used in this project (“Banner” from 2015 Banner Framelits, “Arch” from Creative Haven dies, and “Oval” from Lovely Arrangement Dies)
- Mechanical pencil
- Pentel Clic (white) Eraser in Holder
- Paper snips or small scissors (for fussy cutting)
- Small metal washer on the thicker side with a flat edge, not rounded. (Explore hardware stores)
Adhesive
- Multipurpose liquid glue or adhesive of your choice (I prefer Amazon’s Glitter Glue and the needle tip with stainless steel pin)
💡 Tip:
These techniques work best with simple die shapes like banners, ovals, and arches. More intricate or highly detailed dies can still be traced, but may not work as well with the washer technique shown below.
Technique 1: Tracing for Custom Layers (Banners)

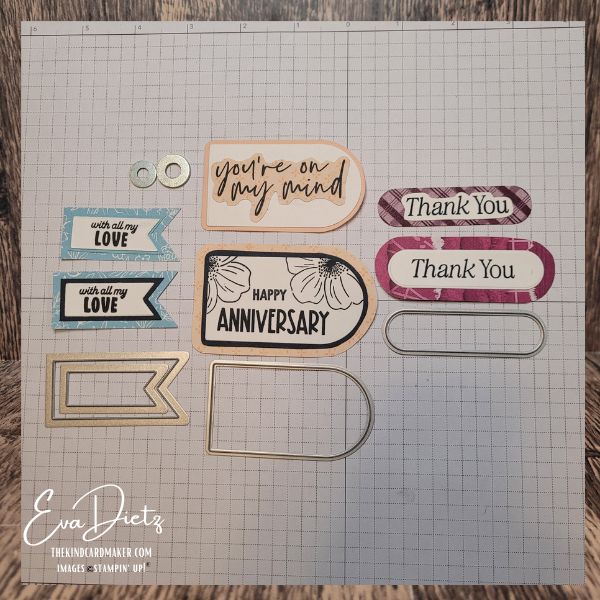
By only using the two smallest dies of the banner set, here’s how to get three layer tags.
1) Start by die cutting your smallest banner from Basic White cardstock. Stamp the sentiment next on the Basic White.
2) Using that same small banner die as a guide, flip it over and trace around it onto your coordinating paper or cardstock using a mechanical pencil. Fussy cut the traced shape and layer it behind your stamped sentiment layer. Adhere those two layers together with an even margin all around.
3) Using the next largest banner die, die cut your last layer in either cardstock or DSP.
4) Important to notice: When you stack the three banner layers together (before adhering the 3rd layer) you will notice that you cannot see much of the larger banner. So you have a choice, do you want a narrower margin on the 2nd layer so more of the 3rd layer will show, or do you want a more even and balanced look? if you want a balanced look, only fussy cut a proportionate amount off the 2nd layer. Once you are happy with your sizing, then adhere the 3rd layer to the first two layers. Refer to photos above about the margin sizing examples.
This technique allows you to create a custom-sized layer even when you don’t have a matching die. It also allows you to keep the tag as small as you want it to be.
👉 Color Tip: Try both strong contrast (like black) and soft contrast (like blues) to see how dramatically it can change the final look of your tag!
Technique 2: The Washer Trick (Arched Die)


For a wider border from only one die, try this clever metal washer trick!
Turn your die with the cutting edge facing down, place it on your DSP or cardstock, and hold it firmly with your fingers as you set the small metal washer next to the outer edge of the die as your spacing guide. Insert your mechanical pencil into the center washer hole and carefully with light pressure, draw around the outer edge of the die to create the wider border. You will need to reposition your fingers as you move around the die shape. Fussy cut your traced piece and layer it behind your die cut image for a perfectly spaced border.
Please note, that if you are able to flip your fussy cut larger border over and then adhere it to the other layers, you won’t have to potentially erase your pencil line. But if the paper you are using is dark colored, you may have to do some erasing after all layers are glued together.
Referring to the photo above:
1) The top tag has DSP stamped, traced and then the fussy cut sentiment is adhered to the Basic White die cut shape, then the die was flipped over and traced on Petal Pink cardstock to make the smaller border layer behind.
2) The middle tag has the 3 layers with a little more fancy Basic White stamped sentiment and additional flower images. Basic Black cardstock was traced with the arch die reversed and then Petal Pink cardstock with the washer trick was fussy cut to create the 3rd layer.
3) You’ll see in the Finished Card photos below, one more arched tag that was stamped like the middle tag above, but the other two layers are both traced and fussy cut DSP.
Technique 3: Simple Die Tracing (Oval Labels)


By using this single elongated oval die there are several ways you can adapt it for multiple tag designs.
1) Middle Top Image – Cut the oval die twice on your die cutting machine with Basic White and choice of DSP. With the chosen stamp, flip it over and trace the (reverse) flat side with your mechanical pencil on the Basic White die cut out. Fussy cut on the pencil line. Flip Basic White over and stamp chosen sentiment on outlined stamp shape. (No erasing needed.) Then adhere to other die cut piece of DSP.
2) Middle Lower Image – Cut the oval die once with Basic White. Stamp sentiment on Basic White oval. Then on chosen DSP, flip oval die over and carefully do the washer trick around the die edge with your mechanical pencil. Fussy cut out larger oval on the pencil line. Adhere both layers together.
3) Right “Pink” Thank You Image – This oval tag has 3 layers. First layer – Basic White for the stamped “Thank You”. Second layer – DSP was traced with the oval die reversed and fussy cut out. Third layer – DSP was traced using the washer trick and all three layers adhered together to create the complete tag.
It’s a quick and easy way to add a professional finish without needing additional dies.
Video Tutorial for Visual Learners
Prefer to see it in action? Watch the full step-by-step tutorial below. Please subscribe to my channel and click the bell to be notified when I upload a new video!
Stretch Simple Dies for Cardmaking in These Lovely Finished Card Ideas
These custom labels look beautiful on these finished cards! Try adding your gorgeous tags to simple layouts to let your layered elements shine. Whether you prefer bold contrast or soft blending, these techniques help you create exactly the look you want.


The Anniversary card above was created with a Basic White card base, Secret Sea cardstock layer, and Lovely Blossoms DSP layer and envelope flap. The tag was stamped in Secret Sea ink using the Reason to Celebrate stamp set and the Lovely Arrangements stamp set.
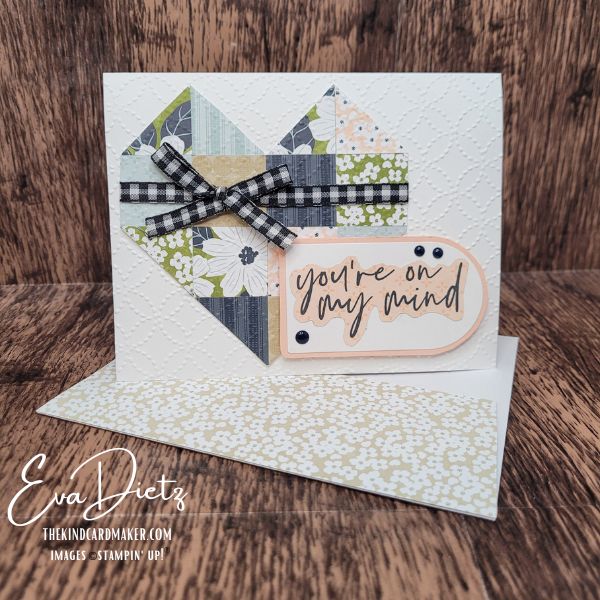


The quilted heart card was made with a Basic White card base, with the front embossed with the Quilt Top Textured Impressions embossing folder. The inside layer of Petal Pink was also embossed. The heart was made with 1″ squares using the Lovely Blossoms DSP and after being adhered down to some Basic White, and heart shape cut out, it too was also embossed with the Quilt Top embossing folder. The tag used the Fabulous Saying stamp set stamped in Secret Sea ink. The Black and White 1/4″ gingham ribbon around the heart and the Moody Palette Glossy Dots complete the card.
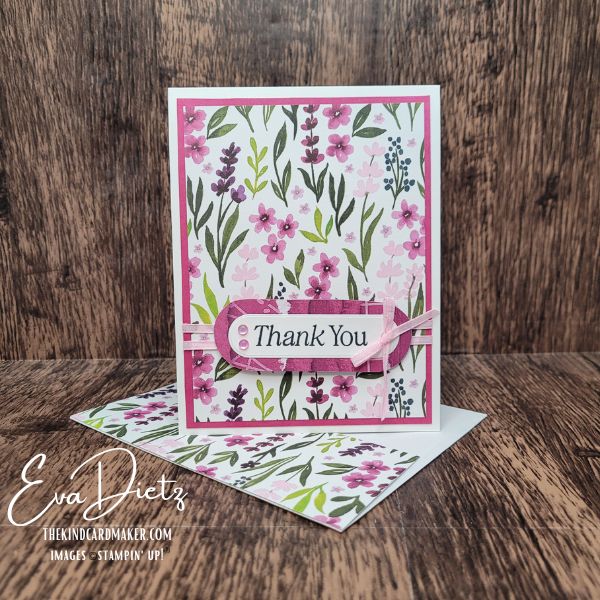

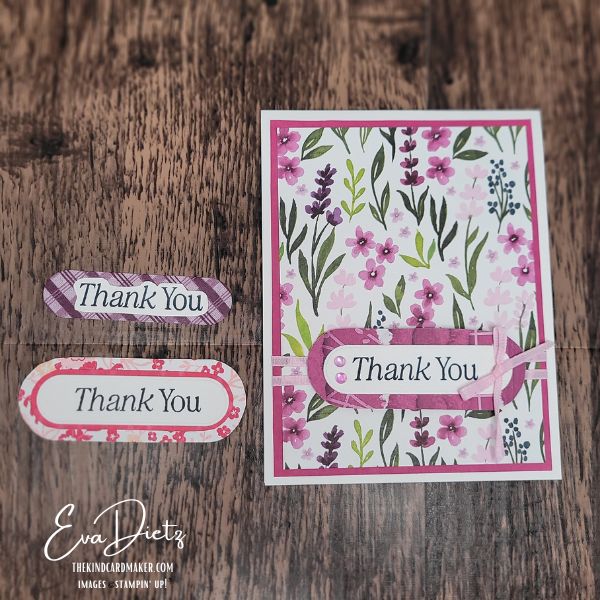
This Thank You card is so cheerful and bright. Built on a Basic White card base with a Berry Burst cardstock layer and Celebratory Sips DSP. The inner layer repeats the florals. The Lovely Arrangements stamp set provided the Thank You stamped in Memento ink. Bubble Bath 1/8″ ribbon was used along with Frosted Iridescent Dots embellishments.
Final Thoughts
You don’t need more dies to create beautiful layered designs—you just need to use the ones you have in a creative way. These simple techniques give you more flexibility, more control, and more confidence in your cardmaking.
If you enjoy learning techniques like this, be sure to explore my Paper Crafting Techniques page and my Paper Crafting Tips page for even more ideas!
Keep the Creativity Going
If you enjoyed learning this technique and making these cards, here are a few ways we can keep creating together:
Get more card and tip ideas in your inbox
Join my Email List and choose a free card tutorial as my thank-you gift.
Try a monthly creative kit
Paper Pumpkin is a fun all-in-one crafting kit that shows up ready to create.
Looking for retired favorites?
Browse my Etsy Shop for retired Stampin’ Up! products and special crafty finds.
Shopping has its perks!
Orders of $50 or more earn Loyal Shopper Rewards towards a future crafting spree.
Happy Crafting,

0 Comments