The three cards that are made from this sponge dauber and ink technique using a decorative mask is fun and easy to do. I recommend you give this idea a try.
Let’s Explore the Materials Used in this Stencil Technique

This leaf mask from the Abundant Beauty Decorative Masks is perfect for fall.

To start doing this technique you need to use just a little bit of double-sided adhesive to affix your 3 3/4″ x 5″ piece of Basic White to your grid paper to hold it in place. Then place the mask on top of the Basic White and scotch tape down the edges in several places, so the mask will not move at all.
Use a selection of fall ink colors and sponge finger daubers to start applying the colors where you like. I inked up the dauber then pressed straight up and down on the mask, so the ink would go into all the corners. I did not wipe the dauber across the mask. It is fun to mix a couple colors on one image and see what the result is.
The ink colors I used were Sweet Sorbet, Calypso Coral, Daffodil Delight, Copper Clay, Wild Wheat, Cajun Craze, Old Olive, and Garden Green.

After removing the mask from the finished paper, I wanted to add one more little bit of color. Using the Pebbled Path ink pad, an old toothbrush, and a wooden coffee stirrer stick, I was able to add microscopic dots of the Pebbled Path ink on top of the leaf shapes. Ink up the toothbrush and then drag it across the stirrer stick so the ink will flick off onto the Basic White cardstock.
Let’s Assemble These Cards Using the Stencil Technique We Just Finished!


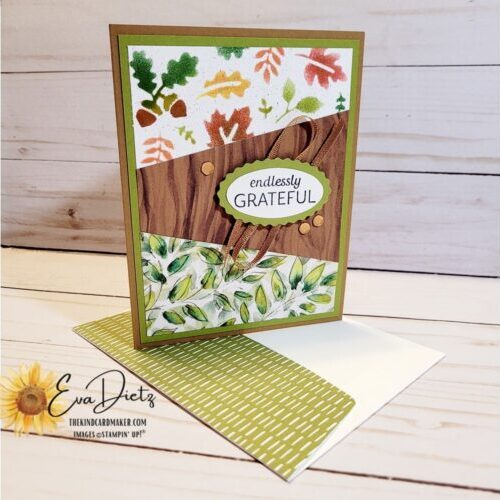
To assemble the three cards, prepare 3 Pecan Pie card bases. Cut 5 1/2″ x 8 1/2″ then score at 4 1/4″. Add an Old Olive layer cut 4″ x 5 1/4″ directly to the card base. Using two patterns from the Joy of Christmas Designer Series Paper cut two pieces 3 3/4″ x 5″. Stack all three papers one on top of the other and using your paper trimmer, make two diagonal cuts, to create three sections.
Arrange the cut sections to create three different card fronts like you see in the photo above. When you are satisfied, then you can adhere them to the Old Olive layer. I recommend adhering the top and bottom sections first so you have 1/8″ margins, then the middle section should fit just like a puzzle piece would.
On a scrap of Basic White and Early Espresso or Pecan Pie or Memento Tuxedo Black ink, stamp the greeting from the Very Best Occasions stamp set. Then punch out the three tags using the Double Oval Punch. With a scrap of Old Olive cardstock, then punch the larger oval for the backing of the greeting. Adhere both layers together.
Decide which direction your cards will look their best and lay the tags in place to see how they look. If you like your arrangement, then adhere your choice of a matching ribbon to the back of the tag. I used a retired ribbon that came from the Basketweave & Metallic Ribbon Pack. Add dimensionals to raise the tags up on the card front. Finish with some of the Neutrals Adhesive Backed Sequins.
Don’t Miss the Details of the Inner Liner and Envelope Flap!

On a 4 ” x 5 1/4″ piece of Basic White stamp this scripture verse from the Courage & Faith stamp set in Memento Tuxedo Black Ink and adhere to the inside of the card.
For the envelope flap you’ll need a piece 2 1/4″ x 6″ of Old Olive from the Regals 6″ x 6″ Designer Series Paper (DSP). Adhere the DSP to the exterior envelope flap and trim off excess. Also cut a 1/2″ x 4″ piece and adhere to the bottom of the inside card layer. Repeat these last two directions two more times to finish the three cards completely.
Now you have some thoughtful Thanksgiving or Fall cards to send or give to your family and friends letting them know you are grateful for them and their love and friendship towards you.
Check out this card idea using more of the Abundant Beauty Decorative Masks HERE.


0 Comments