If you need an extra special holiday card, try using this embossing paste technique along with the Abundant Beauty Decorative Mask with the Snowflake pattern. Combine it with Shimmery White Embossing Paste and you will have the winning combination to WOW whoever was the one lucky enough to receive your work of art during the holidays or new year.
Let’s Get Started with this Embossing Paste Technique!

This card started out as shown above with a layer of Blueberry Bushel cardstock cut to 3 3/4″ x 5″. I used a small amount of adhesive to attach the cardstock to my grid paper so it wouldn’t move. Using a palette knife I spread the Shimmery White Embossing Paste through the taped down decorative mask on top of the cardstock. When I was happy with the thickness I removed the mask. I have to say I really liked the thickness of the mask, and it was easy to clean up afterward. I was pleased with the results overall.
To add even more WOW to it I sprinkled retired Dazzling Diamonds glitter on top of the wet embossing paste to add more sparkle. As I look back on my process, I think I should have left the mask in place before I sprinkled the Dazzling Diamond glitter. It probably would have kept the excess off the cardstock itself.
Assembling the Front Together After Doing the Embossing Paste Technique

Then you adhere the dried paste on the cardstock to a piece of Vellum Basics 12″ x 12″ Designer Series Paper. I used the polka dot pattern cut to 4 1/4″ x 5 1/2″. To keep the adhesive from showing through I added another 3 3/4″ x 5″ piece of coordinating Winter Meadow Designer Series Paper on the reverse side.
Slide the triple layers into a clear envelope and seal it shut. Adjust the contents to one side and you should have almost a 1/4″ of a clear envelope showing on the edge.
Assembling the Card Back to the Front

Next you enclose that 1/4″ edge of the clear envelope in between a folded piece of 4 1/4″ x 11″ Basic White cardstock, scored at 5 1/2″. Us Tear and Tape on both sides of one half of the Basic White to make a functioning card!
Inside Peek

The inner stamped greeting comes from the Phrases for All stamp set, stamped in Blueberry Bushel ink. The bubbles come from the Days to Remember stamp set, also stamped in Blueberry Bushel ink. I should have moved them away from the edge, however, because they show through the vellum when the card is closed. (Live and learn!)
The Embossing Paste Technique Created This Masterpiece!

Next using the Decorative Circle punch, punch out a white glimmer paper circle. With a scrap of Basic White punch out a 2″ circle. Using the Throughout the Year stamp set and more Blueberry Bushel ink, stamp the greeting as shown. Affix the two layers together. Add an 8″ piece of sparkly ribbon folded in half behind the tag with trimmed ends (I used retired 1/4″ Snowflake Shimmer Ribbon) and raise the whole tag up on dimensionals and affix to the clear envelope. Add three Rhinestones to the clear envelope and you are finished with the card!

Extreme close up of the fun tag on the card front! Don’t you just love all the shimmer and shine?
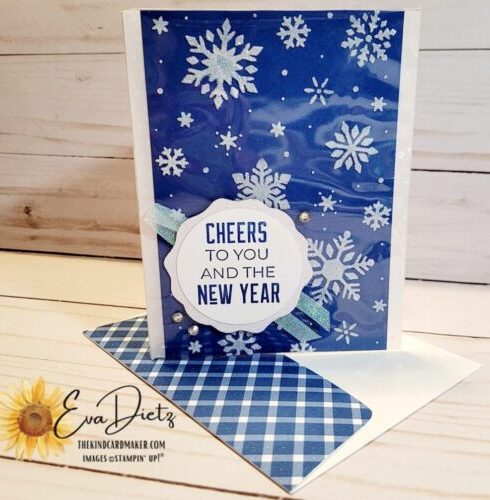
Don’t forget to decorate your envelope flap too to make a matching set. I used the Glorious Gingham 6″ x 6″ Designer Series Paper in Blueberry Bushel on the exterior flap of a Medium Basic White Envelope. Cut it 2 1/4″ x 6″, adhere and trim off the excess.
Check out this card idea using more of the Abundant Beauty Decorative Masks HERE.


0 Comments