This Card Design is a Go-To Layout to Use Frequently
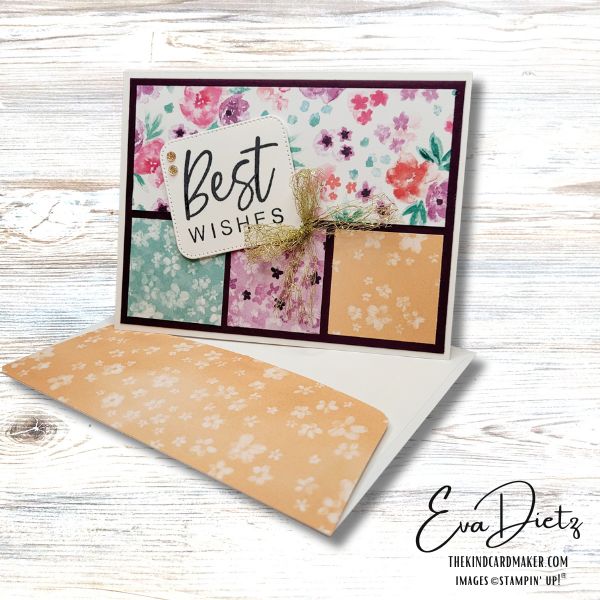
Crafting an easy handmade card is like sending a little piece of your heart through the mail. If you love elegant yet simple designs, this “Best Wishes” paneled card will quickly become one of your go-to projects. Featuring the gorgeous Bloom Impressions Designer Series Paper from the 2025 Sale-a-Bration products, and a bold sentiment, this card is perfect for birthdays, weddings, anniversaries, or any special occasion that calls for heartfelt wishes.
Follow along as I break down the supplies and step-by-step instructions to create this stunning handmade card. Whether you’re a seasoned cardmaker or just starting out, you’ll find this project both fun and rewarding!

Supplies You’ll Need For This Easy Handmade Card
- Cardstock:
- Basic White cardstock: 5 1/2″ x 8 1/2″ (score at 4 1/4″ for card base) and 2 1/2″ x 3″ piece for tag
- Blackberry Bliss cardstock: 4″ x 5 1/4″
- Designer Paper: Bloom Impressions Designer Series Paper (DSP)
- 2″ x 5″
- 1 5/8″ square (two pieces)
- 1 5/8″ x 1 1/2″
- Die Cutting & Stamping:
- Basic White cardstock die-cut using the second largest Rectangle shape die from the Nested Essential Dies (shortened with a second pass through the die-cutting machine.)
- Sentiment: “Best Wishes” from the With You in Mind stamp set
- Ink: Memento Tuxedo Black Ink
- Embellishments, Adhesives & Extras:
- Gold Open Weave Trim
- Mini Glue Dots
- Adhesive-Backed Sparkle Gems
- Stampin’ Dimensionals
- Stampin’ Seal adhesive
- Coordinating envelope flap (Basic White envelope + DSP measuring 2 1/4″ x 6″)
- Paper Trimmer
- Simply Scored
- Bone Folder
- Paper Snips
- Die Cutting Machine
- Take Your Pick Tool

Step-by-Step Instructions
Step 1: Prepare Your Card Base
Start by scoring your 5 1/2″ x 8 1/2″ Basic White cardstock at 4 1/4″ to create a top-folding card base. This will serve as the foundation for your layered design.
Step 2: Layer with Blackberry Bliss
Trim a piece of Blackberry Bliss cardstock to 4″ x 5 1/4″. Adhere this layer to your card base using your preferred adhesive. This deep, rich color will create a striking contrast against the patterned paper.
Step 3: Cut and Arrange the Designer Series Paper
Using the Bloom Impressions DSP, cut the following pieces:
- 2″ x 5″ (this will serve as the largest panel at the top)
- Two 1 5/8″ squares (lower left and right corners)
- One 1 5/8″ x 1 1/2″ piece for the lower center section
Arrange the patterned paper pieces onto the Blackberry Bliss layer as shown in the reference image. Once you’re happy with the layout, adhere each piece securely.
Step 4: Create the Sentiment Tag
Die-cut a piece of Basic White cardstock using the second-largest rectangle die from the Nested Essential Dies. To shorten it, pass it through your die-cutting machine a second time. Stamp the “Best Wishes” sentiment from the With You in Mind stamp set using Memento Tuxedo Black Ink. Let it dry for a few seconds to prevent smudging.
Raise the sentiment tag using Stampin’ Dimensionals and adhere it slightly off-center to the left.
Step 5: Add the Bow and Embellishments
Take the Gold Open Weave Trim and fold it into thirds. Tie a small bow and affix it next to the sentiment tag using Mini Glue Dots.
Finish off your card with two Adhesive-Backed Sparkle Gems placed near the sentiment for a touch of elegance and shimmer.
Step 6: Complete the Coordinating Envelope
To make your card extra special, decorate the envelope flap with matching DSP. Cut a piece of Bloom Impressions DSP to 2 1/4″ x 6″ and adhere it to the envelope flap. Trim the excess to fit.
Easy Shopping Links
Product List
Final Thoughts
And there you have it—a beautiful, easy handmade “Best Wishes” paneled card that will wow anyone who receives it. The combination of elegant floral patterns, rich Blackberry Bliss cardstock, and delicate embellishments makes this a timeless design for any occasion.
If you love card-making tutorials like this, be sure to share this post and check out more DIY card projects here at The Kind Card Maker website. Have fun creating, and remember—the best cards are made with love!
Happy Crafting!
If you’d like to explore a couple more easy project ideas, click here or here.
Thanks for stopping by today! I’d love to hear from you! Leave a comment below.


![Basic White 8 1/2" X 11" Cardstock [ 159276 ] Basic White 8 1/2" X 11" Cardstock [ 159276 ]](https://assets1.tamsnetwork.com/images/EC042017NF/159276s.jpg)
![Blackberry Bliss 8-1/2" X 11" Cardstock [ 133675 ] Blackberry Bliss 8-1/2" X 11" Cardstock [ 133675 ]](https://assets1.tamsnetwork.com/images/EC042017NF/133675s.jpg)
![Bloom Impressions 12" X 12" (30.5 X 30.5 Cm) Designer Series Paper [ 164944 ] Bloom Impressions 12" X 12" (30.5 X 30.5 Cm) Designer Series Paper [ 164944 ]](https://assets1.tamsnetwork.com/images/EC042017NF/164944s.jpg)
![With You In Mind Photopolymer Stamp Set (English) [ 164747 ] With You In Mind Photopolymer Stamp Set (English) [ 164747 ]](https://assets1.tamsnetwork.com/images/EC042017NF/164747s.jpg)
![Tuxedo Black Memento Ink Pad [ 132708 ] Tuxedo Black Memento Ink Pad [ 132708 ]](https://assets1.tamsnetwork.com/images/EC042017NF/132708s.jpg)
![Gold 1 1/2" (3.8 Cm) Open Weave Trim [ 165715 ] Gold 1 1/2" (3.8 Cm) Open Weave Trim [ 165715 ]](https://assets1.tamsnetwork.com/images/EC042017NF/165715s.jpg)
![Mini Glue Dots [ 103683 ] Mini Glue Dots [ 103683 ]](https://assets1.tamsnetwork.com/images/EC042017NF/103683s.jpg)
![Adhesive Backed Sparkle Gems [ 161288 ] Adhesive Backed Sparkle Gems [ 161288 ]](https://assets1.tamsnetwork.com/images/EC042017NF/161288s.jpg)
![Stampin' Dimensionals [ 104430 ] Stampin' Dimensionals [ 104430 ]](https://assets1.tamsnetwork.com/images/EC042017NF/104430s.jpg)
![Stampin' Seal [ 152813 ] Stampin' Seal [ 152813 ]](https://assets1.tamsnetwork.com/images/EC042017NF/152813s.jpg)
![Basic White Medium Envelopes [ 159236 ] Basic White Medium Envelopes [ 159236 ]](https://assets1.tamsnetwork.com/images/EC042017NF/159236s.jpg)
![Paper Trimmer [ 152392 ] Paper Trimmer [ 152392 ]](https://assets1.tamsnetwork.com/images/EC042017NF/152392s.jpg)
![Simply Scored [ 122334 ] Simply Scored [ 122334 ]](https://assets1.tamsnetwork.com/images/EC042017NF/122334s.jpg)
![Bone Folder [ 102300 ] Bone Folder [ 102300 ]](https://assets1.tamsnetwork.com/images/EC042017NF/102300s.jpg)
![Take Your Pick [ 144107 ] Take Your Pick [ 144107 ]](https://assets1.tamsnetwork.com/images/EC042017NF/144107s.jpg)
![Stampin' Cut & Emboss Machine [ 149653 ] Stampin' Cut & Emboss Machine [ 149653 ]](https://assets1.tamsnetwork.com/images/EC042017NF/149653s.jpg)
![Paper Snips [ 103579 ] Paper Snips [ 103579 ]](https://assets1.tamsnetwork.com/images/EC042017NF/103579s.jpg)


0 Comments