Let’s Be Interactive with this Puzzle Slider Card
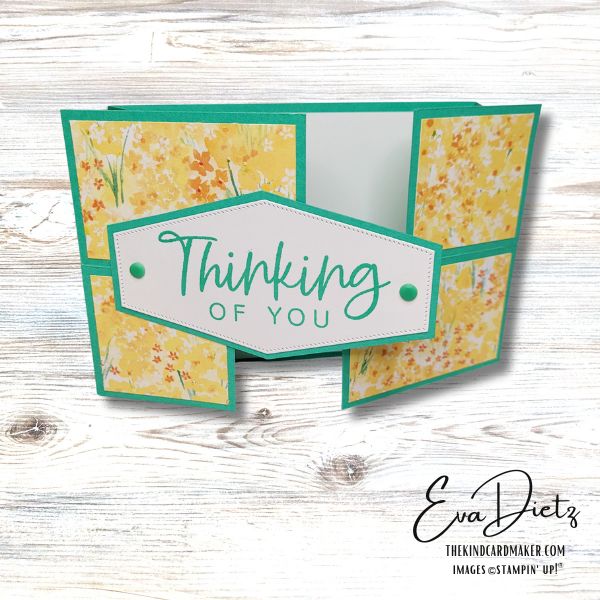
There’s nothing quite like the joy of a handmade card, especially when it is the Puzzle Slider Card and comes with a fun interactive element! Today, I’m sharing this step-by-step tutorial for my Puzzle Slider Card that will wow your recipients. Whether you’re crafting for a birthday, a thinking-of-you sentiment, or just because—this design is sure to stand out. With its unique folding technique and eye-catching layout, this project is both beginner-friendly and satisfying for seasoned cardmakers alike. So, grab your supplies, and let’s get creative!

Puzzle Slider Card Supplies You’ll Need:
Papers:
- Shy Shamrock cardstock:
- Card base: 4 1/4″ x 9 1/2″, scored at 1″, 2”, 7 ½” and 8 ½”
- (2) pieces: 2 1/8” x 3 ¼”
- (2) pieces: 2 1/8” x 2 ¼”
- Sentiment Tag 2 3/4″ x 5″
- Bloom Impressions Designer Series Paper (DSP):
- 3 ¾” x 5” (for puzzle panel)
- 1” x 3 ¾”, cut into (2) ½” x 3 ¾” pieces
- Envelope flap: 2 1/4″ x 6″
- Basic White Cardstock:
- Inner layer: 4” x 5 ¼”
- Sentiment tag: 2 3/4″ x 5″
- Basic White Medium Envelope
Ink & Stamps:
- Shy Shamrock Ink
- With You in Mind Stamp Set (for sentiment)
Tools & Adhesives:
- Paper Trimmer
- Simply Scored
- Bone Folder
- Die Cutting Machine
- Nested Essentials Dies
- Stampin’ Seal Adhesive
- Take Your Pick Tool
Puzzle Slider Card Step by Step Instructions:
1. Preparing the Card Base
- Score the Shy Shamrock card base at 1″, 2”, 7 ½” and 8 ½”.
- Fold the 2” score line forward, then fold the 1” score line backward. Repeat on the opposite side.
- Burnish your folds well with a bone folder to ensure crisp edges.
2. Creating the Puzzle Pieces
- Take the 3 ¾” x 5” DSP piece and cut it in half lengthwise at 1 7/8”, giving you two pieces.
- Take the top piece and cut at 3”, creating one 3” and one 2” section.
- Take the bottom piece and cut at 2”, leaving one 2” and one 3” section.
- Adhere these DSP puzzle pieces onto the matching Shy Shamrock mats, ensuring they fit like a puzzle when assembled.
3. Attaching the Puzzle to the Card Base
- Apply adhesive to the 1” wide folded flaps on the card base.
- Carefully adhere the cardstock mats to the left and right flaps, making sure the puzzle pieces align correctly in the center when the card is closed.
4. Creating the Sentiment Tag
- Use the largest elongated Nested Essentials Die hexagon to cut the 2 3/4″ x 5″ piece of Basic White cardstock.
- Stamp “Thinking of You” from the With You in Mind stamp set using Shy Shamrock ink.
- Mat the sentiment layer onto a Shy Shamrock die-cut hexagon (created by tracing the die’s outer edge and cutting with a paper trimmer).
- Attach the sentiment tag only to the left side puzzle flaps, ensuring it does not adhere to the right flap so the card can open properly.
- Add the two 2024-26 InColor Resin Dots as shown on the front tag.
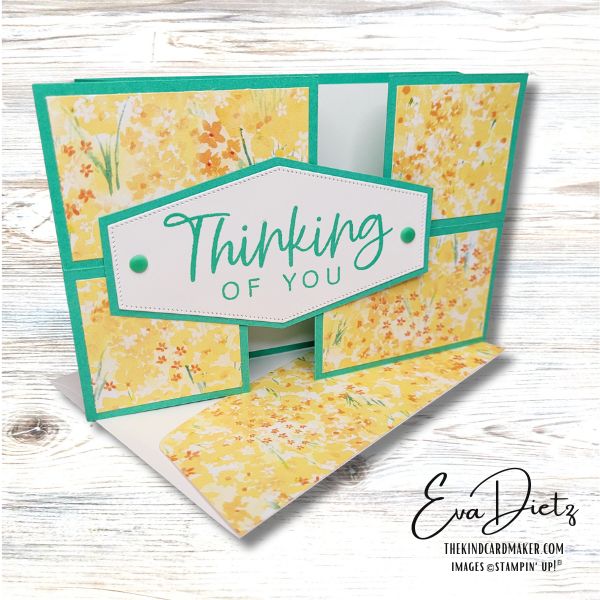
5. Finishing the Inside Layer
- Adhere the 4” x 5 ¼” Basic White cardstock inside the card.
- Affix the two ½” x 3 ¾” DSP strips to the left and right sides of the inner panel.
6. Decorating the Envelope
- To create a matching envelope, attach the 2 1/4″ x 6” DSP to the envelope flap and trim to fit.
Easy Shopping Links
Product List![Basic White 8 1/2" X 11" Cardstock [ 159276 ]](https://assets1.tamsnetwork.com/images/EC042017NF/159276s.jpg "Basic White 8 1/2\" X 11\" Cardstock [ 159276 ]") | ![Basic White Medium Envelopes [ 159236 ]](https://assets1.tamsnetwork.com/images/EC042017NF/159236s.jpg "Basic White Medium Envelopes [ 159236 ]") | |||
![Paper Trimmer [ 152392 ]](https://assets1.tamsnetwork.com/images/EC042017NF/152392s.jpg "Paper Trimmer [ 152392 ]") | ![Simply Scored [ 122334 ]](https://assets1.tamsnetwork.com/images/EC042017NF/122334s.jpg "Simply Scored [ 122334 ]") | ![Bone Folder [ 102300 ]](https://assets1.tamsnetwork.com/images/EC042017NF/102300s.jpg "Bone Folder [ 102300 ]") | ![Stampin' Cut & Emboss Machine [ 149653 ]](https://assets1.tamsnetwork.com/images/EC042017NF/149653s.jpg "Stampin' Cut & Emboss Machine [ 149653 ]") | |
![Nested Essentials Dies [ 161597 ]](https://assets1.tamsnetwork.com/images/EC042017NF/161597s.jpg "Nested Essentials Dies [ 161597 ]") | ![Stampin' Seal [ 152813 ]](https://assets1.tamsnetwork.com/images/EC042017NF/152813s.jpg "Stampin' Seal [ 152813 ]") | ![Take Your Pick [ 144107 ]](https://assets1.tamsnetwork.com/images/EC042017NF/144107s.jpg "Take Your Pick [ 144107 ]") |
![Shy Shamrock 8 1/2" X 11" Cardstock [ 163795 ]](https://assets1.tamsnetwork.com/images/EC042017NF/163795s.jpg "Shy Shamrock 8 1/2\" X 11\" Cardstock [ 163795 ]")
![Bloom Impressions 12" X 12" (30.5 X 30.5 Cm) Designer Series Paper [ 164944 ]](https://assets1.tamsnetwork.com/images/EC042017NF/164944s.jpg "Bloom Impressions 12\" X 12\" (30.5 X 30.5 Cm) Designer Series Paper [ 164944 ]")
![Shy Shamrock Classic Stampin’ Ink Refill [ 163817 ]](https://assets1.tamsnetwork.com/images/EC042017NF/163817s.jpg "Shy Shamrock Classic Stampin’ Ink Refill [ 163817 ]")
![With You In Mind Photopolymer Stamp Set (English) [ 164747 ]](https://assets1.tamsnetwork.com/images/EC042017NF/164747s.jpg "With You In Mind Photopolymer Stamp Set (English) [ 164747 ]")
Final Touches
And just like that, your Puzzle Slider Card is ready to impress! This design is perfect for adding an elegant yet playful touch to your cardmaking collection. The puzzle element makes it interactive, and the layered sentiment tag ensures a polished finish.
If you’d like to explore a couple similar projects, click here and here.
Love this card design? Bookmark this page’s URL up top.
What’s your favorite fun fold technique? Or if this what your first time with this fun fold, let me know in the comments below.


0 Comments