Handmade Christmas Card Tutorial: Believe in Santa with Festive Paintbrushes
Looking for a unique and heartfelt way to celebrate the holidays? This DIY holiday card tutorial will inspire you to create a handmade Christmas card that’s as whimsical as it is festive. Featuring adorable Santa-inspired paintbrushes, this “Believe” card is perfect for sharing the magic of the season with your loved ones.
Whether you’re an avid cardmaker or a beginner exploring festive cardmaking ideas, this step-by-step guide will help you craft a masterpiece that’s sure to stand out this holiday season.
What Makes This Handmade Christmas Card Special?
The “Believe in Santa” card is more than just paper and glue—it’s a celebration of creativity and the joy of the holiday season. By combining bold textures, glittery accents, and festive embellishments, this design perfectly captures the spirit of handmade Christmas cards.
- Whimsical Design: Santa-themed paintbrushes bring a playful twist to holiday cardmaking.
- Versatile Techniques: Perfect for advanced crafters or those ready to try new skills.
- A Thoughtful Touch: Nothing spreads holiday cheer like a card made with love.

What You’ll Need
Here’s everything you need to recreate this card:
STAMPS – Trusty Tools, (Retired) Sending Cheer
PAPER
- Cherry Cobbler Cardstock
- Regal Distressed Patterns Designer Series Paper (DSP) (Red and Gold/White and Gold)
- Festive 12″ x 12″ Glimmer Paper (Red) for Letters
- Basic White Cardstock
- Petal Pink Cardstock for noses
- Basic White Medium Envelope
INK – Memento Tuxedo Black Ink, Cherry Cobbler Ink, Old Olive Ink
STAMPIN’ BLENDS – Light and Dark Cherry Cobbler
DIES – Trusty Tools Dies, (Retired) Suit & Tie Dies (Santa nose), Mini Alphabet Dies
RIBBON – Red and White Baker’s Twine
EMBELLISHMENTS – Holiday Rhinestones (retired) or your choice, Snowflakes (retired)
TOOLS – Blending Brush, Sponge Dauber, Wink of Stella, 1/8” Hole Punch, Paper Trimmer, Clear Stamp block D, Stampin’ Bone Folder, Adhesive Sheets, Seal Adhesive, both sizes of Dimensionals, Cut & Emboss Machine, Take Your Pick Tool, Paper Snips, Simply Shammy.

MEASUREMENTS:
- Cherry Cobbler Cardstock 5 1/2″ x 8 1/2″, scored at 4 1/4″
- Basic White Cardstock (2 pieces) 4” x 5 ¼”, 3 ¼” square, 3” square for Old Olive ink & Blending Brush, 2 ¾” x 4” for 3 paintbrushes, ½” x 2” tag
- Regal Distressed Patterns Designer Series Paper (DSP) 3 ¾” x 5”
- Red Glimmer Paper for BELIEVE 1” x 3”
- Cherry Cobbler 3 1/8” square
- Regal Distressed Patterns Designer Series Paper (DSP) (White Gold Pattern) for Envelope Flap 2 ¼” x 6”
INSTRUCTIONS:
PREPARE THE CARD BASE:
- Prepare Cherry Cobbler Card Base, score as noted. Adhere Inner Basic White cardstock layer to card.
CREATE THE BACKGROUND
- Adhere the Basic White cardstock layer and the Regal Distressed Patterns Designer Series Paper layer to the card front.
PREP THE ADHESIVE BACKED WORD
- With Red Glimmer Paper and Adhesive Sheet, Die cut out “BELIEVE” using Mini Alphabet Dies.
MAKE THE PAINTBRUSH SANTAS
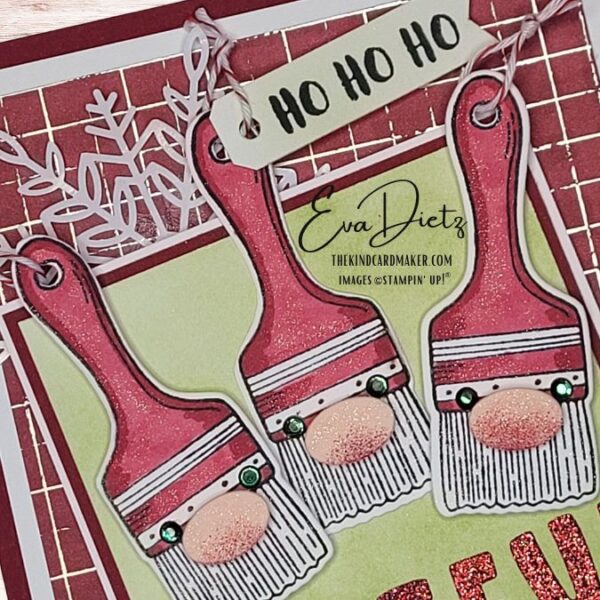
- With Memento Tuxedo Black Ink, stamp the 3 paintbrushes on 2 ¾” x 4” Basic White piece. With 1/8” hole punch, punch the holes in each paintbrush handles. Color paintbrushes using Light and Dark Cherry Cobbler Stampin’ Blends Alcohol Markers.
- With Petal Pink Cardstock die cut oval noses from the Suit and Ties Dies. With sponge dauber add a little Cherry Cobbler ink on lower half of nose. At this point use the Wink of Stella pin to add the glitter wash on the front of the 3 paintbrushes. With Mini Dimensional affix nose to each paintbrush. Add green rhinestones for eyes.
BUILD THE SENTIMENT TAG
- With the ½” x 2” Basic White for tag, stamp ”HO HO HO” in Memento Tuxedo Black Ink using the Sending Cheer stamp set.
- With paper snips cut angles and banner end on tag. Punch 1/8″ hole at top of tag.
- Attach the tag to one paintbrush handle with Red and White Baker’s Twine.
- Add more Red and White Baker’s Twine to the other two paintbrush handles referring to photo. Place Mini Dimensionas on the back of the tag. Wait to place later in these instructions.
CREATE A LAYERED FOCAL PIECE
- Adhere the Cherry Cobbler 3 1/8” square to the Basic White 3 ¼” square. With the 3” square of Basic White, use the Old Olive Ink and Blending Brush to create a light background for the paintbrushes and word. Adhere this brushed/inked layer to the other two square layers.
ADD THE SENTIMENT
- Affix the “BELIEVE” at the base of the triple layered square. Now add the snowflakes to the card front making sure they do not hang over the card’s outside edge. Raise up the triple layered square on Dimensionals and affix as shown in photo.
FINAL TOUCHES
- Finish the card front by placing the paintbrushes as shown in the photo with the center one flat but now peel off the backing of the Mini Dimensionals and affix on card front as shown. Place the outer two raised on Mini Dimensionals.
- Adhere and trim the DSP for the Basic White Envelope to match.
DOWNLOAD PROJECT TUTORIAL
Why You’ll Love Making This Card
Handmade Christmas cards like this “Believe” design are perfect for spreading holiday joy while showcasing your creativity. The playful paintbrush Santas and glittery accents make this card a true showstopper.
- Perfect for Crafting Enthusiasts: This design is fun and engaging, with opportunities to showcase stamping, die cutting, and blending techniques.
- Unique Holiday Theme: Combines festive cheer with crafting flair.
- Beginner-Friendly Steps: Easy to follow for crafters of all skill levels.
- Personalized Charm: Perfect for gifting or displaying as part of your holiday decor.
- Endlessly Customizable: Switch up the colors or add different embellishments to make it uniquely yours!
- A True Keepsake: The combination of textures, glimmer, and holiday charm makes this a card anyone would cherish.
Share Your Creations!
I’d love to see your take on this festive design. Share your finished cards on social media and tag me @TheKindCardmaker. Let’s inspire each other and keep the holiday spirit alive!


0 Comments