Blueberry Bunches Center Fun Fold Card Brings Summer Memories
For many years now during Pacific Northwest summers, blueberries grow in our backyard. Hubby and I have 10 well-established bushes. It’s my husband’s job to do the actual picking (because I hate the spiders that make their homes among the leaves), but I do the jam making or filling up the freezer containers so we can enjoy them year round.
I have two favorite things I love to do with our blueberries. The first is combining our homegrown blueberries, raspberries, and strawberries with vanilla greek yogurt. Add a little Quaker brand granola and it is one of the best summer breakfasts out there in my opinion. The second is making Blueberry Banana Bread using Bisquick Baking Mix. I’ll share my childhood recipe that uses Jiffy Baking Mix at the end of this post (I substitute Bisquick because it is more readily available these days.)
Why make one loaf when you can make 3 is my motto? Out come 3 bowls and 3 stirring spoons. Each loaf is mixed by hand. I add one cup of fresh or frozen blueberries at the very end before the batter goes into the loaf pans. We devour those loaves pretty quickly because they are so yummy.
So when I saw this Blueberry Bunches Stamp Set in the January-April 2024 Mini Catalog, I ordered it right away. So many great summer memories with blueberries in them. Especially this visit from our daughter a couple years ago, as she was standing among the bushes munching away.

Blueberry Bushel Stamp Set

A happy daughter munching blueberries.
Let’s Get Started On This Card!

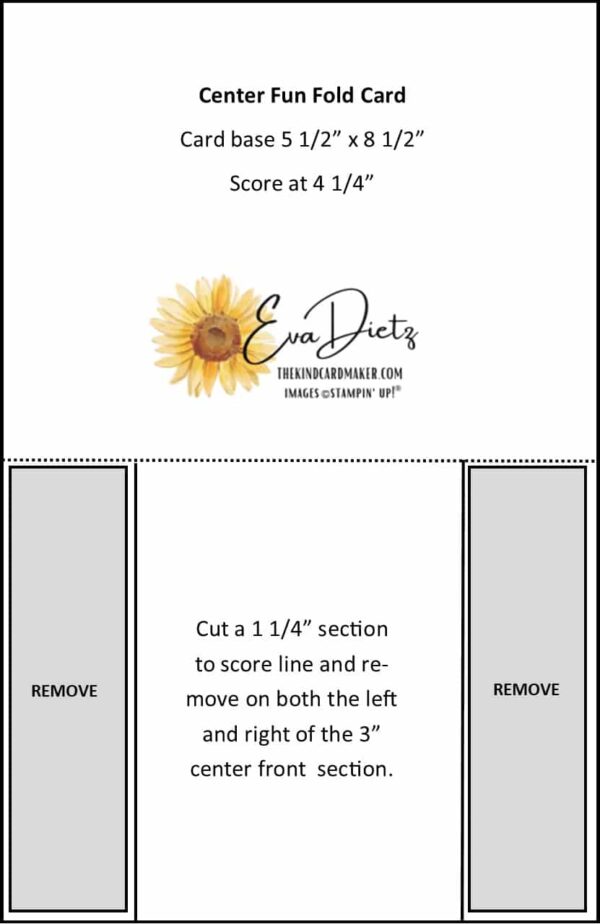
Cutting the Center Fun Fold Card Base
Hint: Lately I have been trying to score my card base cardstock first, then slice it into the two card bases for a total of 2 trips down the paper trimmer track. If you cut the sheet into card bases first, then you have to score each card base separately equaling 3 trips down the track, so my hint saves you a step. (I’m all about efficiency!)
The Center Fun Fold layout isn’t hard to do, but you must be precise with your cutting using my diagram provided below. One great thing about the Stampin’ Up! Paper Trimmer is the clear cutting track has a ruler on it, so you can measure how far you need to cut very easily. The cutting blade also has a crosswise center line so you know exactly where to stop on the ruler. I would recommend you practice on some scraps of cardstock before attempting it with your actual Blueberry Bushel cardstock.
Once you feel confident, prepare your actual Blueberry Bushel card base (s).
I also recommend you go ahead and make two cards at the same time. One to give and one to save as a fun fold template to make again in the future.


Cutting All the Paper Layers
- Blueberry Bushel card base done using the above cutting diagram.
- Basic White cardstock – 2 side pieces of 1″ x 4″, 1 center piece 2 3/4″ x 4″, 1 inner layer 2 3/4″ x 4″.
- Glorious Gingham 6″ x 6″ Designer Series Paper in Blueberry Bushel – Large Plaid 2 pieces 3/4″ x 3 3/4″, Small Plaid 1 piece 2 1/2″ x 3 3/4″ plus 3/8″ x 2 3/4″ strip for inner card.
- Birthday Tag – Blueberry Bushel 1″ x 3 5/16″, Basic White 7/8″ x 3 3/16″
- Basic White cardstock for Blueberry Branch image – 3″ x 4″

Let’s Assemble the Center Fun Fold Card!
- Adhere all the Basic White cardstock and Blueberry Bushel plaid layers on the front of the card.
- On the Basic White cardstock inner layer piece, stamp “happy birthday” from the Best Family Ever Stamp Set in Blueberry Bushel ink in the upper portion. Adhere the small plaid strip near the bottom of the inner layer piece. Then adhere the finished inner layer piece to the inside of the fun fold.
- For the Birthday tag on the center front panel, stamp the shown greeting in Blueberry Bushel ink on the Basic White cardstock tag. Adhere Basic White tag to the Blueberry Bushel tag piece and set aside for a little bit.
- On the remaining piece of Basic White, stamp the blueberry branch image in Memento ink. With the light shade of Blueberry Bushel Stampin’ Blends Alcohol Marker color the blueberries. Accent the blueberries with the dark shade of that marker following the lines provided on the image. Color the leaves with the light shade of Old Olive Stampin’ Blends Alcohol Marker. Accent the leaves and STEM with the dark shade of Old Olive. (Even though my sample card has an Early Espresso colored stem, I was having second thoughts on that choice, so I recommend you shade with dark Old Olive and the stem will look like it was freshly picked!)
- Add dimensionals to your prepared tag, pay attention to the portion that will be hanging off the center front section. Using the photos as an example and adhere the tag in place. Fussy cut your blueberry branch image out. Add dimensionals in assorted spots on the reverse side. Adhere your image to the center front section referring to the photos as needed.
- Apply 3 Rhinestone Jewels as shown in the photos for a little sparkle!
- With Blueberry Bushel ink stamp the smaller blueberry leaf image on the lower left corner of the envelope front. (I know the envelope image looks black in the photo but I promise it really is Blueberry Bushel. I had to have it coordinate, of course!


Today’s card is mainly monochromatic (one color) and I hope you like it. Give it a try, you’ll get hooked on this Center Fun Fold card base and find lots of ways to use it with larger stamped images on the center front panel, just like I did with the blueberry branch.
If you are a Blueberry lover too, below are the individual items used in this project and each are linked to my online store. However, if you click the “Order Supplies” larger button below, you will have the entire list populate your shopping cart super fast. You can always click on the delete trashcan image to remove items from your cart that you already own. Or you can use the search bar to add other items you need to your cart. If you don’t have your own Stampin’ Up! Demonstrator I’d be honored to serve you.
Product List
Glorious Gingham 6″ X 6″ (15.2 X 15.2 Cm) Designer Series Paper [163170] $10.50 | |||
| |||
| |||
|
|
| |
|
|
|
|
")


 Designer Series Paper")
")


As promised, here’s my Banana Bread recipe. I add other items besides blueberries to this recipe on occasion, like craisins or chocolate chips.

And posting a comment is always appreciated!


0 Comments